 Incremental backups refer to backups that automatically store any changes that are made so that users are able to choose to revert back whenever necessary instead of backing up entire website files or database structures every time a backup is made. This process is similar to the processes you see in Dropbox and other similar features. By making incremental backups, one will no longer have to deal with issues like backups timing out since every small updates are saved every time.
As a result, the user’s backup process are more reliable and less resource intensive on their servers. This also secures additional data since users will then be able to restore parts of their website whenever anything needs to be reverted or experiences corruption, which is more efficient compared to having to restore entire websites. For example Certain plugins fail to function properly after updating them. You can revert them by simply using the formatting before the plugin updates were made instead of having to make a full backup, thereby saving time.
If you make use of WordPress as a CMS platform for your business websites, you will notice that WordPress backups are unfortunately rather unreliable. Restoring them can also be quite a difficult process. To resolve this issue, incremental backups are recommended!
There are many different methods of creating incremental backups. If you plan to save web resources, here is how you can create your own incremental backups:
WP Time Capsule:
 From the same creators that designed InfiniteWP, this plugin is designed as the first standalone plugins that actually offer incremental backups. Currently, the plugin comes as a free version, however, there are plans to create a Pro version with improved features soon! WP Time Capsule is also compatible with the revision history of Dropbox, working to create and restore versions of the wordpress website by relying on linking to the user’s Dropbox account or Google Drive.
The pro version of the WP Time Capsule plugin will be including functions like auto backup, auto reverts (Rollback) as well as staging, which would enable WordPress website users to make use of separate staging sites.
The WP Time Capsule helps backup the user’s WordPress website on a daily basis, as well as creating new restore points so that all information and changes are secured. One drawback of the plugin, however, is that this plugin currently requires live servers to test it out.
1. Creating an Account
 To begin using the WP Time Capsule, users are required to create a free account by visiting the website (WPTimeCapsule(.)com). Select the sign up for free prompt and follow the instructions present. After which, users will be provided a confirmation email with the activation link.
2. Installation and Setup of WP Time Capsule
 Click on it to activate and install. WordPress users are then required to log into their own wordpress site and locate the Add new plugin page.
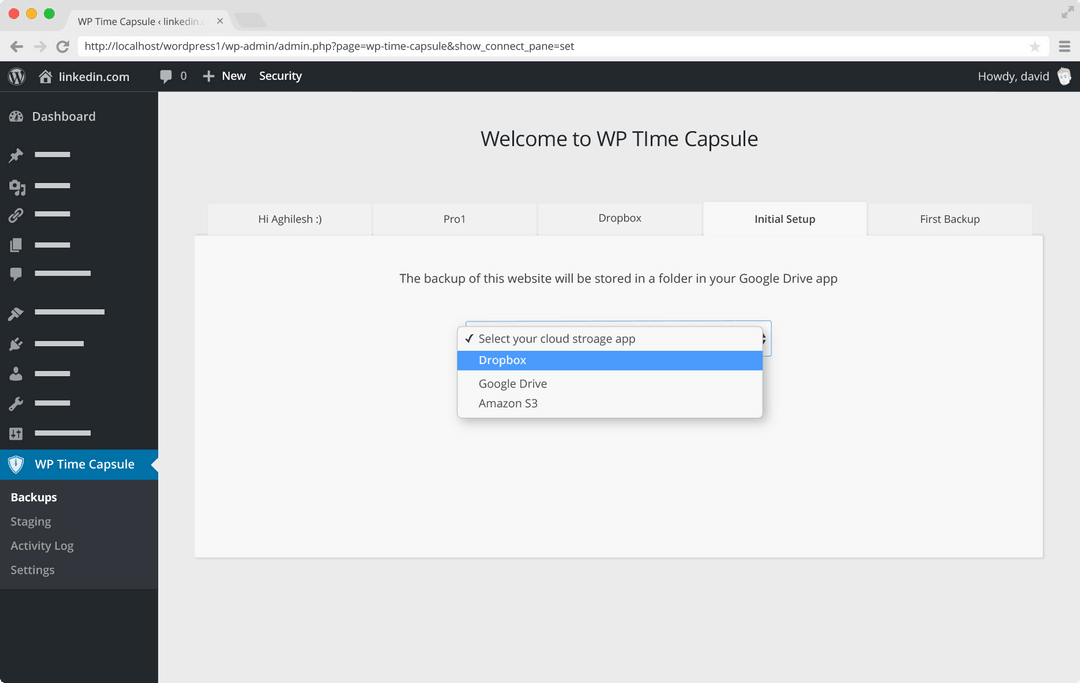
Locate the plugin by looking for WPTC and install it. Once the installation process is complete, you will be required to activate it. Log in to your WP Time Capsule account and decide on the cloud storage app you want the WordPress website incremental backups to be saved to. Make sure that you are also signed in to the cloud storage account.
3. How to Schedule Backups?
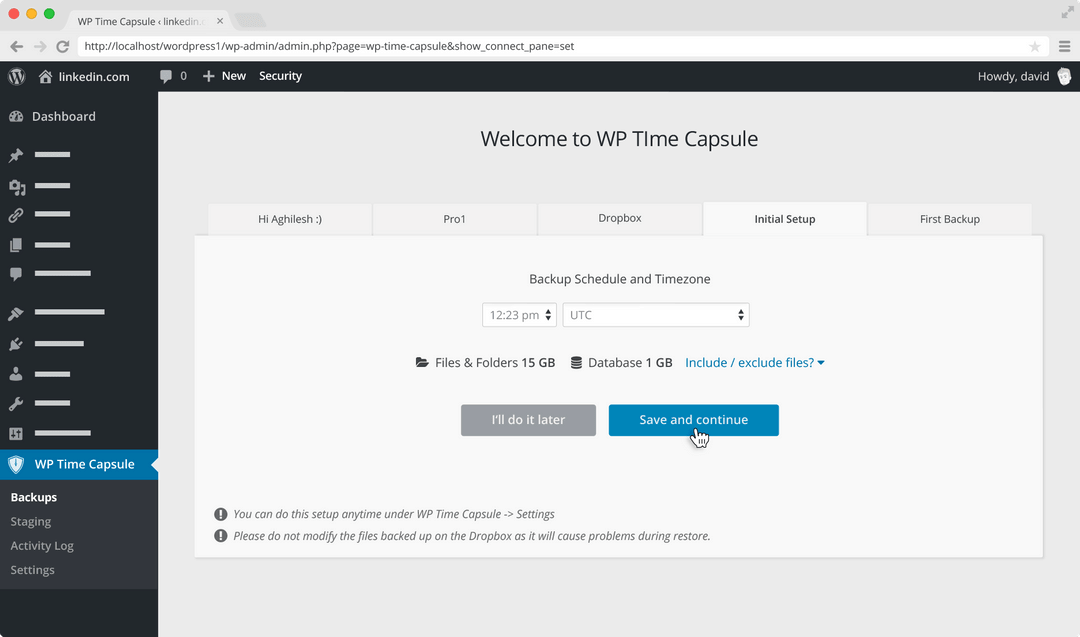
 For productivity purposes, make sure to choose a compatible time of the day for schedule backups and select the city that has the same timezones you are currently under. The WP Time Capsule automatically selects the WordPress core files of the user’s website to backup by default. But users are also able to choose to either include or exclude additional parts of their WordPress files and databases from the backup. This also included file extensions to be excluded as well, though they require manual typing into the relevant text boxes. Once satisfied, select the save and continue option. This will effectively schedule the backup options. The scheduled settings can also be changed anytime the user requires by locating the WP Tie Capsule and locating the settings section.
4. How to Create Backup?
 Now WordPress website users are recommended to begin their first backup. WP Time Capsule works by first syncing the accounts to cloud storage so that uploading can be done. Initial backups will require being created so that subsequently, only changes made will be backed up. Once you click save and continue, the initial backup will begin. Be prepared to wait since the initial process can take either hours or days depending on the WordPress website file size as well as uploading speed so make sure to begin this at a suitable time. Fortunately, this will only be a one time process and subsequent backups take up lesser time.
5. Checking Activity Log?
 After the initial backup process has been completed, website owners can view the activity log to take note of the logging of every event that occurred during the backup process. Daily backups will occur automatically after the whole process so users can simply allow the changes to rest.
6. How to restore Backup?
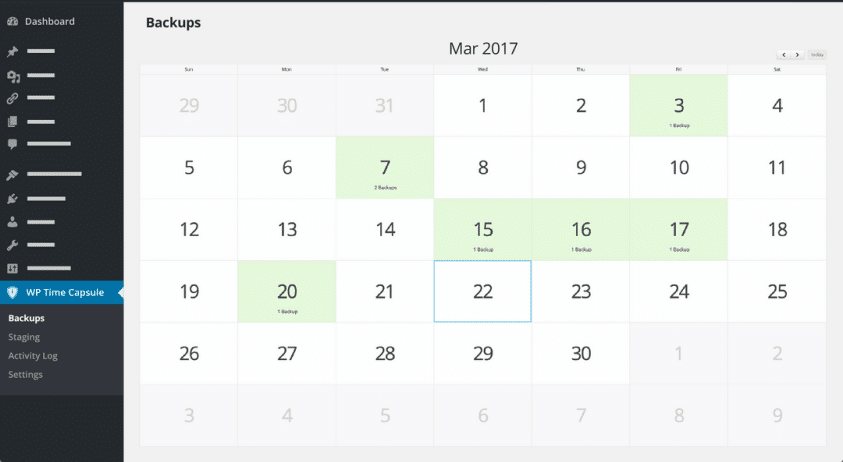
In the event that restoration has to be performed, users can do so by locating the closest restore point. Click on the most recent restore point to restore the website data based on the last functional date. You will then be able to choose what you want to be restored by clicking on the list icon and opening the selection menu. Choose the relevant files and simply choose the restore selected option to apply the changes. Select yes when you are prompted to confirm the process once more and your restoration progress should begin seamlessly. You may also receive an automated email informing you of the restoration process beginning.
7. Where are Backups Saved?
 To access the backups without restoring, you can locate them within the new folder created by WP Time Capsule within your cloud storage app’s main directory. Look for the file with the plugin name and locate the folder titled (yourdomain.com) within it. In the unlikely event that you need to perform a manual restoration, you can do so by opening up the same folder and locating wp-content. Choose the uploads option and select the tCapsule file. You will then be able to choose backups.
Conclusion:
Above is the whole process you can follow to create Free Incremental Backups of your website. WP Time Capsule gives you a easy and simple to follow way of repairing your website with access to a number of restore points. Try this for your website and share your experience with us!! We will love to hear your thoughts!!
Author Bio:
Morris Edwards is a well-known writer and a professional web developer working for Awebstar, Web Development Company based in Singapore. He loves to share his intangible knowledge on the web related to WordPress development tips and tricks. If you are about to find WordPress programmer for hire then get in touch with him.


