


Android OS has gained tremendous share and popularity in Mobile App Development in last few years. Accordingly the job market demand is increasing for Android Mobile App Developer. This Android Interview Questions Tutorial is designed in a way to help developers grasp the technology and enhance their skill from beginner to advance level, as well as preparing them well for an Android Interviews.
Below Mobile App Development Tutorials will provide a better understanding about various Mobile App Development Technologies and trends:
- Mobile App Development Trends
- jQuery Mobile App Development - Handy Guide for Beginners
- HTML5 Mobile App Development
- Native Vs Hybrid Vs HTML5 Mobile App Development
- Hybrid Mobile App Development with PhoneGap, AngularJS and Bootstrap
You will be able to download this article in PDF Version shortly here “Android Interview Questions and Answers PDF“.
Android Interview Questions List
- What is Android? Explain briefly.
- Describe Android Operating System’s Architecture?
- What is Dalvik Virtual Machine? Also explain about kernel used in Android?
- What are resources? and resource IDs (R.java) in android application?
- What is an Activity in Android Development? Explain activity Lifecycle?
- What is an Intent? Explain explicit and implicit Intent.
- What is broadcast Receiver. Please Explain?
- What is android manifest file?
- What is a content provider in android?
- What is ListView and Adapter in android? Please explain.
- What are the different storages available in android?
- What is shared preference? Please give some example code.
- What is Android Interface Definition language?
- What is fragment in android?
- What is the difference between a fragment and an activity and relationship between them?
- Explain the Relative Layout and Linear Layout?
- What is handler in android? Please explain.
- Explain Service and IntentService? What is the main difference between them?
- What is ADB? Kindly explain.
- What is APK format?
What is Android?
Android is open-source mobile application platform as well as an operating system (OS). This OS is based on Linux kernel system; and it was mainly design for touchscreen device such as smart phone, tablet, TV and so on. This OS currently owned by google; but initially this OS development started by Android Inc, and the main driving force behind this OS development are Andy Rubin, Rich Miner, Nick Sears and Chris White; and google own this OS at July 2005. The first release Android OS name was Cupcake (Android 1.5); as time passes google release different version of Android OS with different name such Éclair (Android 2.0/2.1), FroYo (Android 2.2), Donut (Android 1.6) and so on; the current (while I am writing the content) Android OS is Nougat (Android 7.0).
Now alongside the smart phone, google also release same version of Android OS for wearable device and [Internet of Things] (IoT) embedded systems. There are various smart device manufacturing companies such as HTC, Sony, One Plus, Samsung and so on; use Android OS to build their smart device. At present the Android OS is too much popular all around world; as result there are more than 2 million of applications exist in Android’s App store; also it has rich community support; and more application developer all around the world as compared Apple’s IOS developers.
Above picture illustrate the home screen of Android OS (Nougat 7.0 with some Google apps).
Describe Android Operating System’s Architecture?
For an Android Interview Questions Series, it’s really important to understand Operating System before diving deeper for more detailed questions. Android Operating System can graphically represent as follow:
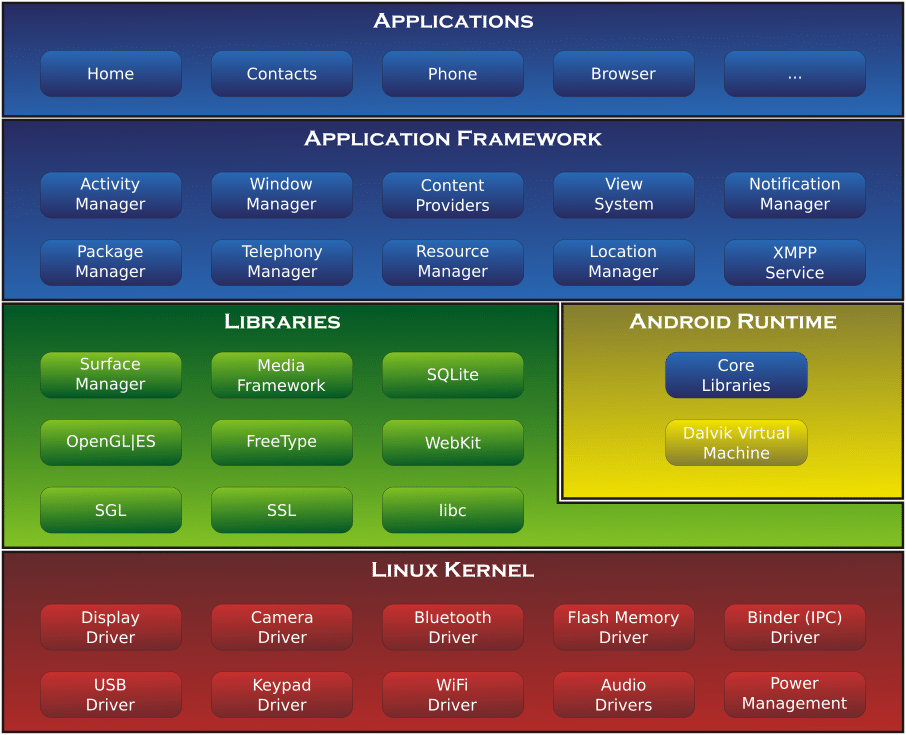
Attribution: This picture taken from Wikipedia.org
As seen from the above diagram Android OS’s architecture can be divided into four main layers the application layer, application framework layer, Core layer include libraries and android runtime, and the Linux kernel.
Because android OS is based on Linux kernel we will start from bottom:
Linux kernel: This layer is the core part of this OS and contains all the code that are responsible for actual communication with device’s drivers such as WIFI driver, Audio driver, Display driver and so on; this layer also handle core functionality such as memory management, security, network, and power management and so on; as Linux kernel is open source so android OS developer use this kernel as a starting point so they can use some predefine built-in kernel component; and also customized the default Linux kernel as result it fulfill the Android OS’s requirement. As android use customized Linux kernel so we cannot run any android application to any other general purpose Linux kernel.
Core layer: This layer run on the top of Linux kernel and contains all core libraries (JAR) that are written in Java language, which define main feature of Android OS; for example SQLite database library provides the required support; so that an application can use it for storing data; Media library provide support for playback of audio and video file; SSL and WebKit libraries provide support for integrated web browsing and Internet security feature; The SGL and OpenGL graphic libraries which provide support for viewing 2D and 3D graphics as well as viewing complex shape on display device such playing game, drawing picture and so on; This layer also contains Android run time which include some core libraries that convert java byte code into dalvik byte code using dalvik compiler; then the Dalvik Virtual Machine (VM), which is special type VM not an general purpose Java VM, which only understand dalvik byte code and convert the dalvik byte code into native machine code that specific to Linux kernel of Android OS. Dalvik VM is a register-based Virtual Machine that optimized byte code to ensure that, a device can run multiple instances efficiently and it also support threading and low-level memory management.
Application Framework: This framework base on the top core layer; and contains java classes; that support android application development. For example through this layer android maintain activity life cycle; provide facilities to access various contents of android, to the main app such as Telephony manger, Calendar provider, SQLite, Shared preference, Location system, and Notification system and so on. That is this layer provides a generic abstraction layer for accessing hardware, manages user interface and application resources of Application layer.
Application Layer: In this layer android developer come into play; that is through this layer we develop our android application and access various service of android OS, through Application Framework. If we think to build an android native application then this layer provide all the functionality, that a developer need; that is through this layer we can access API provided by Android OS’s Application framework.
What is Dalvik Virtual Machine? Also explain about kernel used in Android?
This question in series of Android Interview Questions about Dalvik Virtual Machine describing one of the core component of Android OS; through it applications of Android OS can interact with hardware components. It is a type of Java virtual machine (JVM) but not that general purpose JVM, because its take the java byte code that produce by java compiler and then use dalvik compiler to convert the byte code into dalvik byte code and finally android use Dalvik VM to convert the dalvik byte code into native machine code; where general purpose JVM use java byte code that produce by java compiler and convert the byte code into native machine code. Dalvik VM is a customized JVM and it is a purely interpreted compiler; because it follow the just in time (JIT) compilation principal; which is a type of dynamic translation and because of this dalvik eliminates the overhead that associated with pure interpreted VMs; and also it can perform optimizations on the native code.
The above figure illustrate the difference between Dalvik VM and JVM’s source code compilation process. As seen Android OS add extra layer of compiler (dalvik compiler) to compile source code into machine code that interact with the underlying OS’s kernel.
Android use Linux kernel; as Linux kernel is open source so Android OS developer use this kernel as a starting so they can use some predefine built-in kernel’s components; and also customized the default Linux kernel so it fulfill the Android OS’s requirement. As android use customized Linux kernel so we cannot run any android application to any other general purpose Linux kernel.
What are resources? and resource IDs (R.java) in android application?
When we create an android project by any IDE that support android application development, then the IDE by default create some directories (folders) that support application development and place some predefine specific files to specific folder. For example below picture show a typical android project’s folder structure:
This snapshot taken from Android Studio IDE after creating an android project; as seen there are some folders, among them there is res folder where we can keep our resources like icon, image, xml file, binary file and so on. Those contents that are kept in this folder are called resources of android application. If we want use any of those resources that are kept in res folder, first we have to compile the project (IDE do compilation automatically when we put a new resource into that folder) as result of compilation android asset packaging tool (aapt) generate a R.java file which contains unique IDs for all resources that under res folder; and through those resource ID we can access our desired resource in any class, of the android application; The R.java file generated automatically, so we should not modify that file. For example below show some portion of R.java file:
|
1 2 3 4 5 6 7 8 9 10 11 12 13 14 15 16 17 18 19 20 21 22 23 |
/* AUTO-GENERATED FILE. DO NOT MODIFY. * * This class was automatically generated by the * aapt tool from the resource data it found. It * should not be modified by hand. */ package com.example.tuli.myapplication; public final class R { public static final class anim { public static final int abc_fade_in=0x7f050000; public static final int abc_fade_out=0x7f050001; public static final int abc_grow_fade_in_from_bottom=0x7f050002; public static final int abc_popup_enter=0x7f050003; public static final int abc_popup_exit=0x7f050004; public static final int abc_shrink_fade_out_from_bottom=0x7f050005; public static final int abc_slide_in_bottom=0x7f050006; public static final int abc_slide_in_top=0x7f050007; public static final int abc_slide_out_bottom=0x7f050008; public static final int abc_slide_out_top=0x7f050009; } |
As seen from the above code every resource is identified by a unique value; represent in hexadecimal code and also every int variable is public static and final so we cannot re-assign those variable value.
What is an Activity in Android Development? Explain activity Lifecycle?
In Android OS activity represent a window or view that we see on the display unit of smart device such phone, tablet, smart TV that run by Android OS. Through activity android provide interface so that user can interact with device. For example home screen of android is an activity that houses various application icons. An android application can have zero or more activities; for example a survey application may contains various activities; such as one activity use to take user’s general information, another activity use to take user’s bank account information, another activity show survey company’s information and so on. That is in android through activity (type of container) we can put various components such as text box, radio button, button and so on, so that user can view as well as interact with those components.
From the time when an activity view on display unit and till time when it disappear, activity goes through different lifecycle that can be graphically represented as:
Above figure show the activity life cycle (from beginning to end). In android we create an activity by extending Activity base class as:
|
1 2 3 4 5 6 7 8 9 10 11 12 13 14 15 16 17 18 19 20 21 22 23 24 25 26 27 28 29 30 31 32 33 34 35 36 37 38 39 40 41 42 |
public class MyFirstActivity extends Activity { /** This callback method is called when activity is first created. */ @Override public void onCreate(Bundle savedInstanceState) { super.onCreate(savedInstanceState); setContentView(R.layout.main); Log.d(“Activity instant get created”); } @Override public void onStart() { super.onStart(); Log.d(“Activity Start Visible to User”); } @Override public void onResume() { super.onResume(); Log.d(“User Start Interacting with the activity”); } @Override public void onPause() { super.onPause(); Log.d(“User not interacting acting with me right now”); } @Override public void onStop() { super.onStop(); Log.d(“User not interacting acting with me right now for long time”); } @Override public void onDestroy() { super. onDestroy(); Log.d(“User do not need this activity now”); } } |
As seen from the above code here we override all callback methods that define activity lifecycle.
As seen from the above picture when we first create an activity the onCreate() callback method is get called; usually in this method we initialized various component of activity; such as layout of this activity by calling the setContentView(R.layout.main) method as shown in above code. At this stage activity is not visible yet, it is just created.
When activity become visible to the user, the onStart() callback method is get called. At this stage user still not able to interact with the activity but able to see the activity’s contents. In this callback method we usually put codes; such as that use to create animation or register broadcast receiver that monitor changes which impact activity’s view.
When user start interacting with the activity such as providing input to textbox or clicking a button, then the onResume() callback method get called.
The onPause() callback method get called when user stop interacting with the current activity and start using another activity. Usually in this callback we write code that related to saving activity’s last state. At this stage the current activity is not visible to user.
The onStop() callback method get called when user stop interacting with that activity for long time and activity is no longer visible at this stage. Also at this stage the current activity is not visible to user. But the activity stay in background that is activity still live in memory.
The onRestart() callback method get called when user want to bring back a background activity to the foreground to interact with that activity. As seen from above picture the onStart() callback is always get called after this callback method.
The onDestroy() callback method get called when user manually close the activity or the activity being place in background for long time and android’s garbage collector start cleaning memory because more memory space required by other application. At this stage the activity completely vanish from memory.
As seen from the above picture there is callback hierarchy; that is, if the onDestroy() method get called then we can assume that onPause() , onStop() method already called and finish their work sequentially.
Similarly if onResume() method being executing then we can assume that either onPause() method was being called before it or onPause(), onStop(), onStart() methods are already finished their work sequentially.
What is an Intent? Explain explicit and implicit Intent.
Intent (messaging object) is a mechanism in android through which we can communicate between components of Android OS, Intent’s communication system is asynchronous and also allows us to pass data between application’s components. Through it we can communicate between components of same application as well as other components from different applications. We mainly use intent to start activity, service and broadcast message.
There are mainly two type of Intent
- Implicit Intent
- Explicit Intent
Implicit Intent:
It is type of communication system through which we make a request to android OS for accessing a specific type component of android OS; then android will find that specific type component by searching all of its available components, and provide access of that specific type component. In this case android may find multiple components for a single request because we only specify component type not the exact component. For example, if we click a web address link from an android phone which have multiple browsers installed such chrome, Firefox, and so on; then the android OS will pop up a dialog box that show all the available browser on that phone. That is when we click the web address link; we actually make a request for accessing a component of type browser; and upon receiving request android find all application of type browser, and view it to the user.
Graphically represent this idea as: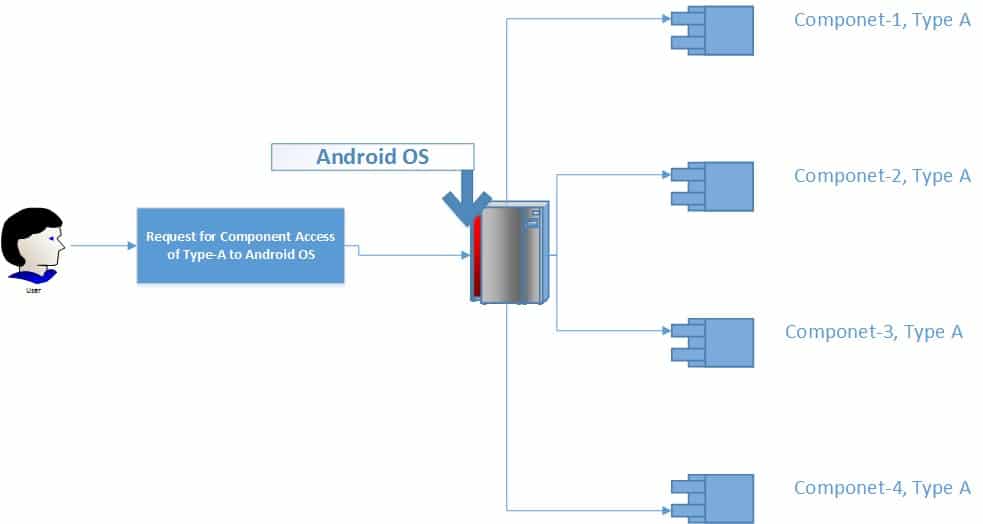
As seen from picture android return all the registered components of type-A.
For example consider the following code:
|
1 2 |
Intent implicitIntent = new Intent(Intent.ACTION_VIEW, Uri.parse("http://www.abcd.com")); startActivity(implicitIntent); |
Here we first create implicit Intent object and then execute the Intent by calling startActivity()method and pass the implicitIntent as it argument. Because of this Implicit Intent (implicitIntent) all available installed browser on that android phone will pop up in a dialog box so, that user can select their desired browser.
As seen to create Implicit Intent Object we have to specify the type of action (Intent.ACTION_VIEW), and provide some related information to its constructor.
Explicit Intent:
In this case we also make a request for accessing a component to the android OS, but here we explicitly define the target component in the Intent object; as a result android OS only find that target component and return to us. We make such type of Intent with the help of with of Context and Class object. For example to start a specific activity we use explicit intent as follow:
|
1 2 |
Intent explicitIntent = new Intent(this,AnotherActivity.class); startActivity(explicitIntent); |
As seen from the above code we make explicit intent object with the help of Context (this) and Class object (AnotherActivity.class) and fire the Intent through startActivity() method; as result we will see AnotherActivity on the display screen of android device.
What is broadcast Receiver. Please Explain?
Broadcast Receiver in android is a component that act as listener and perform some action when certain type of message come to it or some event occur, and its only listen those messages or events, on which the Broadcast Receiver is registered. Through registered a Broadcast Receiver; we telling that, the broadcast receiver, to execute some code that define within it, when certain event occurs in Android OS and otherwise keep quite. Broadcast Receiver can listen to its own application event, as well as other application event. Because in android we broadcast a message or event to the Android OS, not to a specific component, so base on the type of message or event the Android OS find appropriate listeners and pass that message to those specific listener.
To create a broadcast receiver, first we have to define a class that extend BroadcastReceiver base class that have only one abstract method onReceive(Context context, Intent intent) so we have to implement this method. Second we must register the broadcast receiver either in AndroidManifest.xml file of android project or by dynamically through Context.registerReceiver() method.
For example the following code create a simple broadcast receiver:
|
1 2 3 4 5 6 7 8 9 10 11 12 13 |
package com.example.salehinrocky.myapplication; import android.content.BroadcastReceiver; import android.content.Context; import android.content.Intent; import android.widget.Toast; public class Response extends BroadcastReceiver { @Override public void onReceive(Context context, Intent intent) { Toast.makeText(context, "In coming message or event ", Toast.LENGTH_LONG).show(); } } |
Then we register the above Response receiver in the AndroidManifest.xml file as:
|
1 2 3 4 5 6 7 8 9 10 11 12 13 |
<?xml version="1.0" encoding="utf-8"?> <manifest xmlns:android="http://schemas.android.com/apk/res/android" package="com.example.salehinrocky.myapplication"> <application ... <receiver android:name=".Response"> <intent-filter> <action android:name="android.intent.action.BOOT_COMPLETED" /> </intent-filter> </receiver> ... </application> </manifest> |
as seen within AndroidManifest.xml file we register our broadcast receiver through <receiver> tag and within this tag define <intent-filter> element, that tell the android on which event this broadcast receiver will response. In this case we specify android.intent.action.BOOT_COMPLETED event as a result the above broadcast receiver will fired when the Android OS complete it boot process.
What is android manifest file?
Manifest file is a type of xml file, which contains some core information that related to a specific android application. This file must be put in root path of the application directory. Actually this file provide all necessary information that required by Android OS to run that specific application. For example the type of information this file contains such as:
- Package name of the application; that use to identify an application uniquely.
- Contains all permission information; that the user must allow before install that application in Android OS.
- In manifest we must declare various type of components that we will use in application such as activity, service, and broadcast receiver and so on.
- Here we declares the minimum Android API version; that the application required to run.
- This file also contains Instrumentation class information which is used to determine profiling and related information about the application. But those information will be removed before, we published the application.
|
1 2 3 4 5 6 7 8 9 10 11 12 13 14 15 16 17 18 19 20 21 22 23 24 25 26 27 28 29 30 31 32 33 34 35 |
<?xml version="1.0" encoding="utf-8"?> <manifest xmlns:android="http://schemas.android.com/apk/res/android" package="com.example.salehinrocky.myapplication"> <application android:allowBackup="true" android:icon="@mipmap/ic_launcher" android:label="@string/app_name" android:supportsRtl="true" android:theme="@style/AppTheme"> <activity android:name=".MainActivity" android:label="@string/app_name" android:theme="@style/AppTheme.NoActionBar"> <intent-filter> <action android:name="android.intent.action.MAIN" /> <category android:name="android.intent.category.LAUNCHER" /> </intent-filter> </activity> <!--register broadcast receiver--> <receiver android:name=".Response"> <intent-filter> <action android:name="android.intent.action.BOOT_COMPLETED" /> </intent-filter> </receiver> <service android:name=".upWorkService"></service> <uses-permission android:name="android.permission.INTERNET" /> <uses-permission android:name="android.permission.ACCESS_NETWORK_STATE" /> </application> </manifest> |
What is a content provider in android?
As its name implies content provider; provide contents or exchange information between various components of Android OS. Through content provider we can access content of android’s built-in components for example, we can access contact information that stored in android phone; access Image from Image Gallery, as well as through it can use SQLite database of Android OS to persist data, and so on. Also through content provider we can share our own application’s content to other applications. That is content provider in android give us a layer of abstraction (common mechanism) through which we can share information between applications of Android OS.
We implement content provider in android by extending abstract ContentProvider class; this class has 6 abstract methods which we have to implement.
|
1 2 3 4 5 6 7 8 9 10 11 12 13 14 15 16 17 18 19 20 21 22 23 24 25 26 27 28 29 30 31 32 33 34 35 36 37 38 39 40 41 42 43 |
package com.example.salehinrocky.myapplication; import android.content.ContentProvider; import android.content.ContentValues; import android.database.Cursor; import android.net.Uri; import android.support.annotation.Nullable; public class MyContentProvider extends ContentProvider { @Override public boolean onCreate() { return false; } @Nullable @Override public Cursor query(Uri uri, String[] projection, String selection, String[] selectionArgs, String sortOrder) { return null; } @Nullable @Override public String getType(Uri uri) { return null; } @Nullable @Override public Uri insert(Uri uri, ContentValues values) { return null; } @Override public int delete(Uri uri, String selection, String[] selectionArgs) { return 0; } @Override public int update(Uri uri, ContentValues values, String selection, String[] selectionArgs) { return 0; } } |
The above code show the simple implementation of ContentProvider class. By implementing this class we can share our own application’s content to other applications;
We also need to include the content provider’s information to the AndroidManifest.xml as:
|
1 2 3 4 5 6 7 8 9 10 11 12 13 14 |
<?xml version="1.0" encoding="utf-8"?> <manifest xmlns:android="http://schemas.android.com/apk/res/android" package="com.example.salehinrocky.myapplication"> <application ... <provider android:authorities="com.example.contentprovider" android:name=".MyContentProvider"> </provider> ... </application> </manifest> |
as seen from the above, the android:name property of <provider> tag contain the name of the Content Provider class; and android:authorities property contains a URI; so that we can identify the Content Provider in other application’s component of Android OS.
What is ListView and Adapter in android? Please explain.
In android ListView is special type activity that display data in scrollable (vertical) list. That is, it take array or list of data and then view those data as a scrollable list items. ListView along cannot view a list from data source it also required an Adapter. Adapter actually define individual item of list and put the item into ListView and connected with the data source. Graphically we can represent the idea as: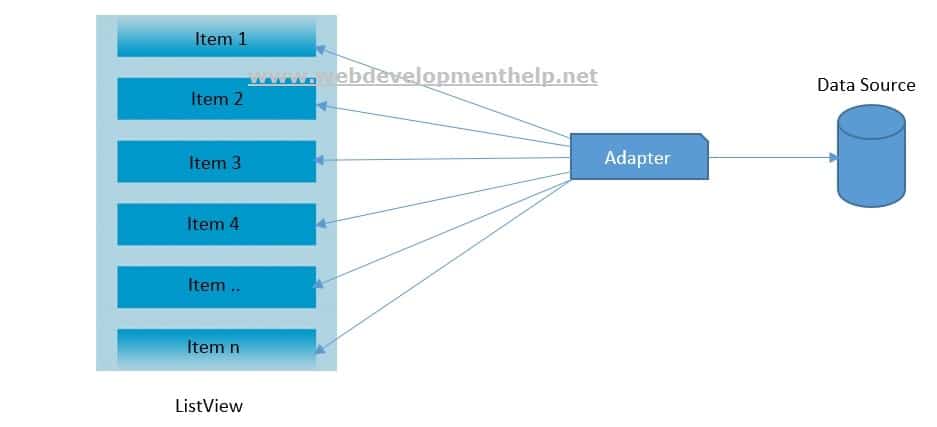
Adapter also specify the format of individual item. For example the following code create a simple list view:
|
1 2 3 4 5 6 7 8 9 10 11 12 13 14 15 16 17 18 19 20 21 22 23 24 25 26 |
package com.example.tuli.myapplication; import android.app.ListActivity; import android.os.Bundle; import android.view.View; import android.widget.ArrayAdapter; import android.widget.ListView; import android.widget.Toast; public class MainActivity extends ListActivity { String[] companyName = { "Cefalo", "Brac", "Vizart", "NewsCread", "LeadSoft", "Selies" }; @Override public void onCreate(Bundle savedInstanceState) { super.onCreate(savedInstanceState); setListAdapter(new ArrayAdapter<String>(this, android.R.layout.simple_list_item_1, companyName)); } } |
as seen here we extend ListActivity to create a list view and within this class we define an string array that act like data source; and within setListAdapter() method we create a ArrayAdapter; while creating ArrayAdapter we pass (Context) this, (android’s built-in item layout) android.R.layout.simple_list_item_1 and also pass the data source that is companyName to its constructor. Because the data source’s data type is string, so we pass String class for ArrayAdapter’s type information as ArrayAdapter<String>. If we run this code we will have the following output:


Continue with More Android Interview Questions and Answers
For more advanced Android Interview Questions related to Storage, Shared Preferences, Interface Definition Language and more, continue with the article below.
What are the different storage available in android?
Android OS provide mainly 4 type of data storage system for application:
- Shared Preferences
- Internal Storage
- External Storage
- SQLite Data base
The type of storage we choose base on our requirement for example if we want to save primitive data (in key value pair) of our application that should not share with other applications of android OS; then we should go for option 1. We use Internal Storage to save application’s private data that is, in device memory; also we can use internal storage to save data that can be shared with other application. We use external storage such as SD card to storage data that can be shared with other application. Also android provide SQLite Database to store application’s structured data privately.
What is shared preference? Please give some example code.
Shared Preference allow us to store android application’s private (primitive) data in key value pair format, it save data in xml file; that cannot be share with other applications of the android OS; we usually use this storage system in such a case, when our application needs to remember some specific setting such as the size of font, user name, ringtone, notification service on or off and so on; that set by the user, so that when next time user open that application again; application will automatically load those setting from shared preference.
To create a SharedPreferences object for our application, we use either getSharedPreferences() or getPreferences() method. Use the first one if we want a preferences file that has a name, so with first approach we can create multiple preference file with different name; and use the latter one, when we need only one preferences file for our whole application.
For example to create shared preference, first we create an Empty android project with android studio IDE and put the following code in activity_main.xml file.
|
1 2 3 4 5 6 7 8 9 10 11 12 13 14 15 16 17 18 19 20 21 22 23 24 25 26 27 |
<?xml version="1.0" encoding="utf-8"?> <LinearLayout xmlns:android="http://schemas.android.com/apk/res/android" xmlns:tools="http://schemas.android.com/tools" android:layout_width="match_parent" android:layout_height="match_parent" android:orientation="vertical" tools:context="com.example.tuli.emptyproject.MainActivity"> <SeekBar android:id="@+id/SeekBar" android:layout_width="fill_parent" android:layout_height="wrap_content" /> <TextView android:id="@+id/TextView" android:layout_width="fill_parent" android:layout_height="wrap_content" android:text="Shared Preferences Example" /> <EditText android:id="@+id/EditText" android:layout_width="fill_parent" android:layout_height="wrap_content" /> <Button android:id="@+id/btnSave" android:text="Save" android:layout_width="wrap_content" android:layout_height="wrap_content" /> </LinearLayout> |
And put following code in MainActivity.java file
|
1 2 3 4 5 6 7 8 9 10 11 12 13 14 15 16 17 18 19 20 21 22 23 24 25 26 27 28 29 30 31 32 33 34 35 36 37 38 39 40 41 42 43 44 45 46 47 48 49 50 51 52 53 54 55 56 57 58 |
package com.example.tuli.emptyproject; import android.app.Activity; import android.content.SharedPreferences; import android.os.Bundle; import android.view.View; import android.widget.Button; import android.widget.EditText; import android.widget.SeekBar; import android.widget.Toast; public class MainActivity extends Activity { SeekBar seekBar; SharedPreferences sharedPreferences; String namedPreference = "givePreferenceName"; EditText editText; String FONT_SIZE = "fontSize"; String TEXT_VALUE = "textValue"; @Override public void onCreate(Bundle savedInstanceState) { super.onCreate(savedInstanceState); setContentView(R.layout.activity_main); editText = (EditText) findViewById(R.id.EditText); seekBar = (SeekBar) findViewById(R.id.SeekBar); Button btn = (Button) findViewById(R.id.btnSave); if (btn != null) btn.setOnClickListener(new View.OnClickListener() { public void onClick(View v) { sharedPreferences = getSharedPreferences(namedPreference, MODE_PRIVATE); SharedPreferences.Editor editor = sharedPreferences.edit(); editor.putFloat(FONT_SIZE, editText.getTextSize()); editor.putString(TEXT_VALUE, editText.getText().toString()); editor.apply(); Toast.makeText(getBaseContext(), "Font size saved successfully!", Toast.LENGTH_SHORT).show(); } }); SharedPreferences prefs = getSharedPreferences(namedPreference, MODE_PRIVATE); float fontSize = prefs.getFloat(FONT_SIZE, 12); seekBar.setProgress((int) fontSize); editText.setText(prefs.getString(TEXT_VALUE, "")); editText.setTextSize(seekBar.getProgress()); seekBar.setOnSeekBarChangeListener(new SeekBar.OnSeekBarChangeListener() { @Override public void onStopTrackingTouch(SeekBar seekBar) { } @Override public void onStartTrackingTouch(SeekBar seekBar) { } @Override public void onProgressChanged(SeekBar seekBar, int progress, boolean fromUser) { editText.setTextSize(progress); } }); } } |
Now run the project either in emulator or phone; and set text value in text box also change seek bar position to change text font size; then click the save button. Now close the app and re-open the app again; you will see that the font size and seek bar position still at the same state.
What is Android Interface Definition language?
Like other Interface definition language (IDL), In android we can also create android interface definition language (AIDL); It allow us to create interface so that both client and server implement the same rules as a result, they can communicate through interprocess communication (IPC). Normally in android one process cannot access memory address of other process. That why implement AIDL to decompose each process object into primitives (int, Boolean, float, char, etc.), so that OS can understand; and as a result client can communicate with the server and vice versa. We can also pass non-primitive data such as class object if that class implement Parcelable interface. We can graphically represent this Idea as follow:
As seen from the above figure it just like another client – server data communication model of Internet. To make a server application in android first we must create a (.aidl) file under the application’s root (src or app) folder. Usually this file contains an interface and this interface contains some (as our requirement) methods as below:
|
1 2 3 4 5 6 7 8 9 10 |
// IMyAidlInterface.aidl package com.example.salehinrocky.myapplication; // Declare any non-default types here with import statements interface IMyAidlInterface { // this interface contains three methods int addTwoNumber(int a, int b); int subtractTwoNumber(int a, int b); } |
Here in the above AIDL interface (IMyAidlInterface.aidl) contains two methods. If we create this file through IDE, then behind screen IDE will automatically create stub class of this interface. Next we need a class that extend the Service base class and override the onBind() method of Service class; within this method we use that auto generated stub class to implement the AIDL interface’s method, which actually expose AIDL interface’s method (in this case addTwoNumber, and subtractTwoNumber method) to client application. For example below code show, how we extend Service base class and implement AIDL interface and return this implemented interface as an IBinder type.
|
1 2 3 4 5 6 7 8 9 10 11 12 13 14 15 16 17 18 19 20 21 22 23 24 25 |
package com.example.tuli.service; import android.app.Service; import android.content.Intent; import android.os.IBinder; import android.os.RemoteException; import android.support.annotation.Nullable; public class MyAIDLService extends Service { @Nullable @Override public IBinder onBind(Intent intent) { return new IMyAidlInterface.Stub(){ @Override public int subtractTwoNumber(int a, int b) throws RemoteException { return a+b; } @Override public int addTwoNumber(int a, int b) throws RemoteException { return a-b; } }; } } |
This complete server application.
Now to consume this service in client application first we need the AIDL interface reference provided by the server application, second we need to implement the ServiceConnection interface; this interface contains two abstract methods onServiceConnected and onServiceDisconnected; through overriding onServiceConnected method we actually make connection with server. For example a simple implementation of ServiceConnection interface, that is the client side code are as follow:
|
1 2 3 4 5 6 7 8 9 10 11 12 13 14 15 16 17 18 19 20 21 22 23 24 25 26 27 28 29 30 31 |
package com.example.tuli.service; import android.content.ComponentName; import android.content.ServiceConnection; import android.os.IBinder; import android.os.RemoteException; public class AidlClient implements ServiceConnection { private static final String TAG = "AIDLExample"; IMyAidlInterface consumeService; @Override public void onServiceConnected(ComponentName name, IBinder service) { consumeService = IMyAidlInterface.Stub.asInterface((IBinder) service); try { consumeService.addTwoNumber(1,5); consumeService.subtractTwoNumber(200,50); } catch (RemoteException e) { e.printStackTrace(); } } @Override public void onServiceDisconnected(ComponentName name) { consumeService=null; } } |
as seen from above code, here we first include the reference of our desired AIDL interface (this case IMyAidlInterface consumeService) as before after including the AIDL interface to client project, the IDE automatically generate the stub class; Second within onServiceConnected method we just bind the server application’s AIDL interface to our local AIDL interface’s reference by casting generic IBinder interface. After this step can use the local AIDL interface’s reference to call remote server’s method as we do in local application’s code as shown in above code.
What is fragment in android?
In the context of Android OS fragment may consider as a small activity within big activity; that is through it we divide user interface (Activity) so that we can have more control, over certain portion of user interface. Fragment have its own lifecycle like normal activity life cycle.
Graphically represent this idea as:
as seen from above picture how different fragments combine to make a single activity; and it look like master details page concept of modern web application. To create a fragment, we must extend the Fragment base class. The Fragment class contains all callback methods like an activity, such as onCreate(), onStart(), onPause(), and onStop(). Fragment lifecycle can be shown as below: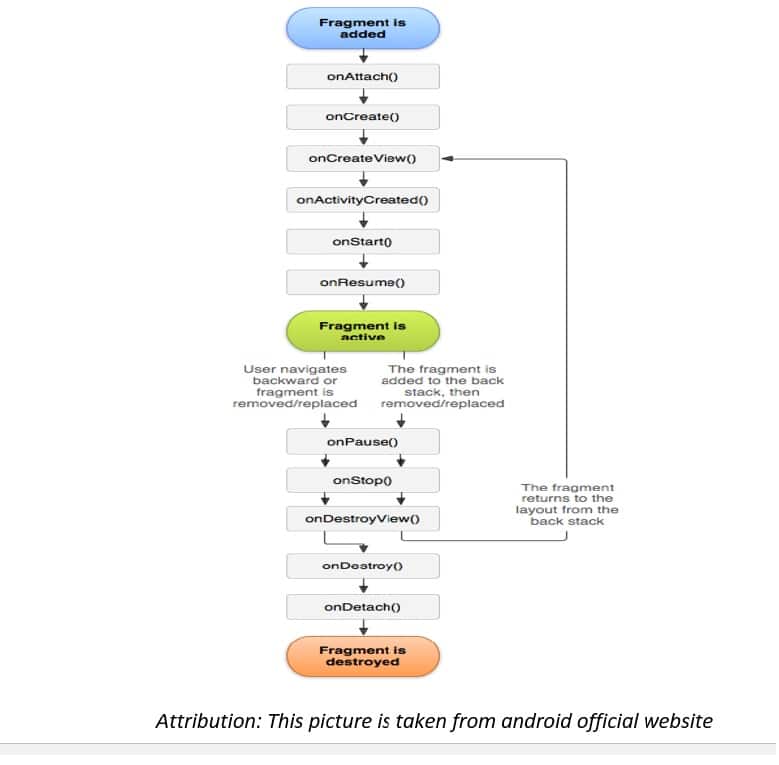
The lifecycle of fragment is only available while it container activity is live; because of that a fragment contains some additional callback method such as onAttach(), onCreateView(), onActivityCreated(), onDestroyView() and onDetachI() as shown in above diagram; those callback make relation between container activity and the fragment. Though android studio IDE we can get, out-of-box master-details project template that show the use of fragment within activity.
What is the difference between a fragment and an activity. Also please define relationship between them?
The main difference between fragment and activity is that the fragment have some extra lifecycle callback function such as onAttach(), onCreateView(), onActivityCreated(), onDestroy() and onDetach(); those callback lifecycle methods do not exist in Activity lifecycle. Also fragment does not required to declare in android AndroidManifest.xml file whereas activity do required. Also we can create nested fragment but we cannot create nested activity.
The relationship between them that fragment cannot exist without an activity. Activity house fragments; so when an activity end it also destroy all of its fragments.
Explain the Relative Layout and Linear Layout?
In LinearLayout we can place views elements side by side either vertically or horizontally also elements align them self. For example consider the following code:
|
1 2 3 4 5 6 7 8 9 10 11 12 13 14 15 16 17 18 19 20 21 22 23 24 25 26 |
<?xml version="1.0" encoding="utf-8"?> <LinearLayout xmlns:android="http://schemas.android.com/apk/res/android" android:layout_width="match_parent" android:layout_height="match_parent" android:orientation="vertical"> <Button android:text="Button" android:layout_width="fill_parent" android:layout_height="fill_parent" android:id="@+id/button3" android:layout_weight="1" /> <Button android:text="Button" android:layout_width="fill_parent" android:layout_height="fill_parent" android:id="@+id/button4" android:layout_weight="1" /> <Button android:text="Button" android:layout_width="fill_parent" android:layout_height="fill_parent" android:id="@+id/button2" android:layout_weight="1" /> </LinearLayout> |
here we put three button in a LinearLayout and set its orientation attribute value to vertical, so all the three button element align them self vertically. If we run this code in a device then, we will have the following output:
If we change the orientation attribute value to horizontal of above LinearLayout then we will have following output as: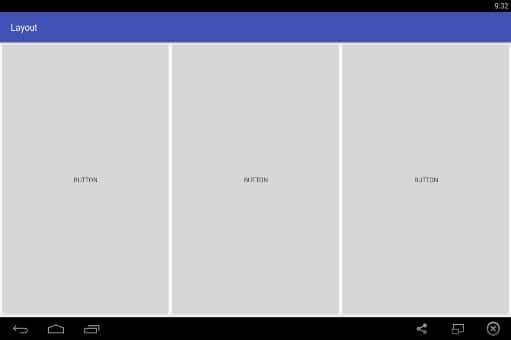
now as we see, all three button place them self horizontally; we do not have to do any thing for their alignment.
But in case of RelativeLayout we have to align element based on other element’s current position. We have to do it either horizontally or vertically to align elements; that is, in RelativeLayout there exist parent and child relationship between elements when we try to align elements. For example consider the following code:
|
1 2 3 4 5 6 7 8 9 10 11 12 13 14 15 16 17 18 19 20 21 22 23 24 25 26 27 28 29 30 |
<?xml version="1.0" encoding="utf-8"?> <RelativeLayout xmlns:android="http://schemas.android.com/apk/res/android" xmlns:tools="http://schemas.android.com/tools" android:id="@+id/activity_main" android:layout_width="match_parent" android:layout_height="match_parent" android:paddingBottom="@dimen/activity_vertical_margin" android:paddingLeft="@dimen/activity_horizontal_margin" android:paddingRight="@dimen/activity_horizontal_margin" android:paddingTop="@dimen/activity_vertical_margin" tools:context="com.example.tuli.layout.MainActivity"> <Button android:text="Button" android:layout_width="wrap_content" android:layout_height="wrap_content" android:id="@+id/button1" android:layout_marginLeft="32dp" android:layout_marginStart="32dp" android:layout_marginTop="54dp" /> <Button android:text="Button" android:layout_width="wrap_content" android:layout_height="wrap_content" android:layout_below="@+id/button1" android:layout_alignRight="@+id/button1" android:layout_alignEnd="@+id/button1" android:layout_marginTop="48dp" android:id="@+id/button2" /> </RelativeLayout> |
as seen here we define two button element in RelativeLayout. The id value of first button is button1 (android:id=”@+id/button1″) and place this button relative to its parent layout which RelativeLayout; here we also notice the value of some properties of first button, such as android:layout_marginLeft=”32dp”, android:layout_marginStart=”32dp”, and android:layout_marginTop=”54dp” those property value are relative to its parent view element which again the RelativeLayout; similarly we align the second button relative to first button and parent layout. if we notice some properties and their values such as android:layout_below = “@+id/button1”, android:layout_alignRight = “@+id/button1”, android:layout_alignEnd = “@+id/button1” and android:layout_marginTop=”48dp” of Second button, then we will find out we align this button relative to the first button and the parent layout; here first button and relative layout act as a parent element of second button, when it comes to alignment. If we run this code we will have the following output:
What is handler in Android? Please explain.
In android handler is special type of object that allow us to communicate between main user interface (UI) thread with any other background thread. In android UI run in a single thread that handle all the UI related task such as updating UI’s views or handle UI’s events. So If we do some task such as downloading a file or processing some data that take long time to complete in UI thread; then until the task is completed UI remain unresponsive; so it should be better to put long running task in separate thread; so that, when the long running task is completed it return the result to UI thread. That is we need a message sending system between the UI thread and background thread; this is where the handler object come in handy that is, it allows us to pass message between UI thread and back ground thread. Each Handler instance is associated with a single thread on which it created. For example consider the following code snippet that shows the use of handler:
After creating Empty project by android studio IDE; put following content in activity_main.xml file.
|
1 2 3 4 5 6 7 8 9 10 11 12 13 14 15 16 17 18 19 20 |
<?xml version="1.0" encoding="utf-8"?> <LinearLayout xmlns:android="http://schemas.android.com/apk/res/android" xmlns:tools="http://schemas.android.com/tools" android:id="@+id/activity_main" android:layout_width="match_parent" android:layout_height="match_parent" android:paddingBottom="@dimen/activity_vertical_margin" android:orientation="vertical" tools:context="com.example.tuli.handler.MainActivity"> <TextView android:layout_width="wrap_content" android:layout_height="wrap_content" android:text="Example of Handler" /> <ProgressBar android:id="@+id/progressbar" android:layout_width="fill_parent" android:layout_height="wrap_content" style="@android:style/Widget.ProgressBar.Horizontal" /> </LinearLayout> |
now put the following code in MainActivity.java file:
|
1 2 3 4 5 6 7 8 9 10 11 12 13 14 15 16 17 18 19 20 21 22 23 24 25 26 27 28 29 30 31 32 33 34 35 36 37 38 39 40 41 42 43 44 45 46 47 48 49 50 51 52 |
package com.example.tuli.handler; import android.os.Handler; import android.support.v7.app.AppCompatActivity; import android.os.Bundle; import android.widget.ProgressBar; public class MainActivity extends AppCompatActivity { int progress; ProgressBar progressBar; int downloadStatus = 0; // Here we create a handler in main thread so it associated with this thread Handler handler = new Handler(); public void onCreate(Bundle savedInstanceState) { super.onCreate(savedInstanceState); setContentView(R.layout.activity_main); progress = 0; progressBar = (ProgressBar) findViewById(R.id.progressbar); if (progressBar != null) progressBar.setMax(100); Thread thread = new Thread(new myRunnableThread()); thread.start(); } //here we implement the Runnable interface that run in separate thread class myRunnableThread implements Runnable { @Override public void run() { while (downloadStatus < 100) { downloadStatus = simulateDownloadFile(); handler.post(new Runnable() { public void run() { progressBar.setProgress(downloadStatus); } }); } } private int simulateDownloadFile() { try { Thread.sleep(500); } catch (InterruptedException e) { e.printStackTrace(); } return ++progress; } } } |
as seen from the code to create background thread here we implement Runnable interface and override the run () method. Within run () method we call simulateDownloadFile () method to simulate the downloading effect. Here after each 500ms time interval we update UI thread through the handler.post () method that within the while loop. That is through handler we can send message from background thread to main UI thread to update main UI’s view element.
Explain Service and IntentService. What is the main difference between them?
In android Service is an application component that run in background (in separate thread) which has no user interface like activity; also it has no relation with activity lifecycle. Service usually use to perform long running task in background. Service is started by calling startService () method from an activity. Once it stared, a service can run in the background without any concern about the component that started the service; that is we have to manually stop a started service by calling stopService () method. For example through service we can continuously log the geographical coordinates of the device.
To create a service; here we first create an empty android project through android studio IDE. Now put following content in activity_main.xml file.
|
1 2 3 4 5 6 7 8 9 10 11 12 13 14 15 16 17 18 19 20 21 22 23 24 25 26 |
<?xml version="1.0" encoding="utf-8"?> <LinearLayout xmlns:android="http://schemas.android.com/apk/res/android" xmlns:tools="http://schemas.android.com/tools" android:id="@+id/activity_main" android:layout_width="match_parent" android:layout_height="match_parent" android:orientation="vertical" tools:context="com.example.tuli.service.MainActivity"> <TextView android:layout_width="wrap_content" android:layout_height="wrap_content" android:text="Example of Service" /> <Button android:layout_width="fill_parent" android:layout_height="wrap_content" android:onClick="startService" android:text="Start a Service" /> <Button android:layout_width="fill_parent" android:layout_height="wrap_content" android:onClick="stopService" android:text="Stop the Stared Service" /> </LinearLayout> |
Then we create a MyFirstService.java under the main package folder and put the following content
|
1 2 3 4 5 6 7 8 9 10 11 12 13 14 15 16 17 18 19 20 21 22 23 24 25 26 27 28 |
package com.example.tuli.service; import android.app.Service; import android.content.Intent; import android.os.IBinder; import android.support.annotation.Nullable; import android.widget.Toast; public class MyFirstService extends Service { @Nullable @Override public IBinder onBind(Intent intent) { return null; } @Override public int onStartCommand(Intent intent, int flags, int startId) { // We want this service to continue running until it is explicitly // stopped, so return sticky. Toast.makeText(this, "Service has been Started", Toast.LENGTH_LONG).show(); return START_STICKY; } @Override public void onDestroy() { super.onDestroy(); Toast.makeText(this, "Service Destroyed", Toast.LENGTH_LONG).show(); } } |
as seen here we extend the Service abstract class and override required methods of its. Next in MainActivity.java file we put the following content:
|
1 2 3 4 5 6 7 8 9 10 11 12 13 14 15 16 17 18 19 20 21 22 23 24 25 |
package com.example.tuli.service; import android.content.Intent; import android.support.v7.app.AppCompatActivity; import android.os.Bundle; import android.view.View; public class MainActivity extends AppCompatActivity { @Override protected void onCreate(Bundle savedInstanceState) { super.onCreate(savedInstanceState); setContentView(R.layout.activity_main); } //here we start MyFirstService public void startService(View view) { startService(new Intent(getBaseContext(), MyFirstService.class)); } //here we stop MyFirstService public void stopService(View view) { stopService(new Intent(getBaseContext(), MyFirstService.class)); } } |
Finally we declare the service in AndroidManifest.xml file as:
|
1 2 3 4 5 6 7 8 9 |
<?xml version="1.0" encoding="utf-8"?> <manifest xmlns:android="http://schemas.android.com/apk/res/android" package="com.example.tuli.service"> <application ... <service android:name=".MyFirstService"></service> ... </application> </manifest> |
If we run this application and click the START A SERVICE button then we will see our defined MyFirstService has been stared that confirmed by the Toast message. Similary if we click the STOP THE STARED SERVICE button then the MyFirstService service will stop. The onBind() method enables us to link an activity to the service; which in turn enables an activity to access members and methods inside a service directly. The onStartCommand() method is called when we start the service explicitly by calling the startService() method. In this method, we returned the constant START_STICKY so that the service will continue to run until it is manually stopped. The onDestroy() method is called when the service is stopped by calling the stopService() method. In this method we usually put code that related to clean up the resources that used by the service.
What is ADB. Please explain.
It is and android debug bridge (ADB) command line tool that allows us to communicate with an either android emulator or device. This tool adb.exe, is located under the platform-tools folder of android SDK. To use this tool first we have to locate adb.exe path in command line prompt of our OS; then we can execute certain command, such to install an apk file on emulator or device we should type:
|
1 |
adb install “someApplication.apk” |
To view currently available connected devices to our computer we can use the following command:
|
1 |
adb devices |
Sometimes we need to restart ADB so that it can connect device or emulator properly; for that we can use the following command:
|
1 2 3 |
adb kill-server adb start-server |
We can also uninstall an application from emulator or device by the following command:
|
1 |
adb uninstall “application_name” |
The Dalvik Debug Monitor Server (DDMS) tool, also use ADB tool to connect with emulator or device.
What is APK Format in Android? Please explain.
It is android application package (APK) file. It is type of zip file that contains all compiled class and resource files of android application. We can consider this file as a final output of our application that ready to install on either emulator or device.
There exist two type of APK file:
- Signed APK
- Unsigned APK
To create a signed APK we need a certificate. But unsigned APK is created automatically by the android IDE when we build a project.
Hopefully this comprehensive list of Android Interview Questions and answers will be beneficial for android developers and help them increase their knowledge about the android app development.
More Web Developer Interview Questions:
- Top 10 ASP.NET Web API Interview Questions
- Top 10 ASP.NET AJAX Interview Questions
- Top 10 WCF Interview Questions
- Comprehensive Series of WCF Interview Questions
- Top 10 HTML5 Interview Questions
- Top 10 ASP.NET Interview Questions
- Comprehensive Series of ASP.NET Interview Questions
- Top 10 ASP.NET MVC Interview Questions