


ASP.NET MVC Partial View
Partial View in ASP.NET MVC serves the same purpose as that of a User Control in ASP.NET Web Forms. In order to reuse a View in our MVC application (For example, placing a header, list of items or footer etc.), Partial Views are introduced that basically renders inside a Parent View.

Let’s take an example to understand the concept of Partial Views in more simple way. Consider we have list of our company products being displayed on Products page of our website. Now, we want to have another web page “Search Product” where we need to display the list of products in same manner but filtered according to a search criteria.
Now, In order to display list of products on “Search Product” page, we have two options:
1. Rewrite all HTML and Code for displaying product list.
2. Or, develop an ASP.NET MVC Partial View for product listing and use on both pages.
- A. TempData stores content in Application state but gets destroyed with session object.
- B. TempData stores content in Session state but gets destroyed earlier than a session object.
- C. TempData and Session are same and can be used alternatively in ASP.NET MVC.
- D. TempData stores content in Session state but stays longer than a session object.
Note: To understand the difference between ViewBag, ViewData, TempData, Session and ModelView by Example, you can follow here.
For a complete ASP.NET MVC online test and Practice Exams, Click Here.
Correct Answers: B
Partial View Advantages in ASP.NET MVC
So, using Partial View in ASP.NET MVC has following advantages:
- Enhances reusability by packaging up common website code instead of repeating the same in different pages.
- Easy to maintain. Changes in future are simple to accommodate.
ASP.NET MVC Partial View Example
Now, let’s implement a very simple example on how to create and use Partial View in ASP.NET MVC application? For the purpose of implementation, we will add a new Partial View (named as “ReusablePartialView”) and use it inside the Index View.
Let’s assume we already have opened an ASP.NET MVC application in Visual Studio. Now in Solution Explorer, go toViews -> Home folder. Then right click on Home folder and Choose Add -> View. Use “ReusablePartialView” as View name and mark the check box as “Create as a Partial View” as shown in following screenshot.
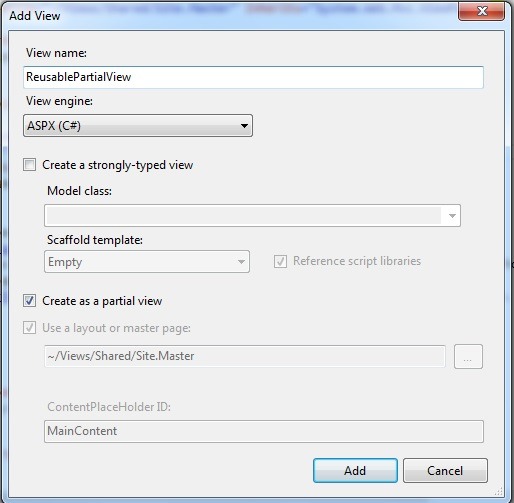
Click on “Add” button. A new Partial View is created in same folder as that of Index View. Now, we can put some reusable content inside our Partial view. I just placed simple text inside my partial view as follows:

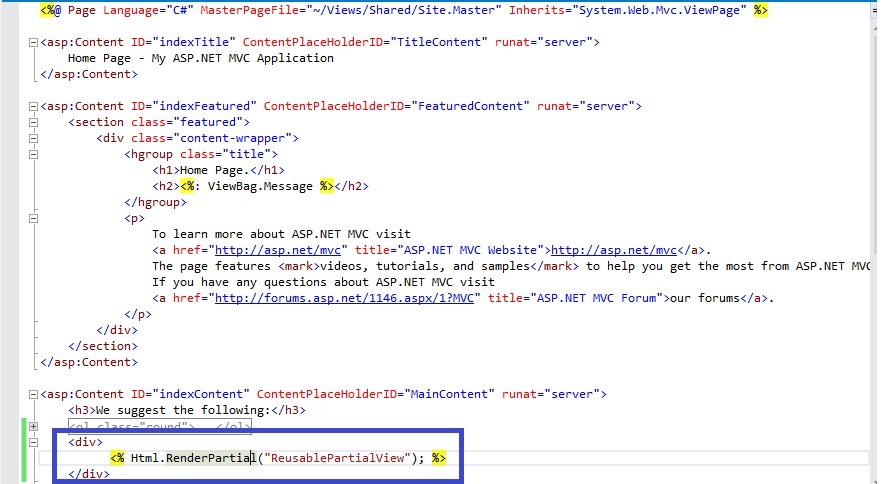
Now, we need to use this partial view in main parent view (i.e. index view). Rendering a Partial View inside another View is quite simple by using Html.RenderPartial function and passing Partial view name as parameter to it.
|
1 |
<% Html.RenderPartial("ReusablePartialView"); %> |
Note: We need to ensure that Partial View exists in same folder as that of main view, otherwise, add the path for the partial view folder in RenderPartial function.
To keep things simple, I just put that code at the end of Index view without making any other change to it as follows:
That’s all done. Now if we run our ASP.NET MVC application, content will be rendered at the bottom as shown below:

We can easily take benefits of ASP.NET MVC Partial Views by following the above step by step approach in more practical scenarios. Hopefully, now the reader will have clear understanding of Partial Views in ASP.NET MVC.
Other Related Articles:
- ASP.NET MVC3 Vs MVC4 Vs MVC5
- Building Your first ASP.NET MVC Application using Entity Framework
- A practical guide to ASP.NET Web API
- Difference between ASP.NET MVC and ASP.NET Web Forms
- WebResource.axd and ScriptResource.axd in ASP.NET
- What’s new in WCF 4.5
- WCF Tutorial step by step
- Creating your first WCF REST Service
Top 10 Interview Questions and Answers Series:
- Top 10 WCF Interview Questions
- Comprehensive Series of WCF Interview Questions
- Top 10 HTML5 Interview Questions
- Top 10 ASP.NET Interview Questions
- Comprehensive Series of ASP.NET Interview Questions
- Top 10 ASP.NET MVC Interview Questions
- Top 10 ASP.NET Web API Interview Questions
- Top 10 ASP.NET AJAX Interview Questions