


This is Part-2 in Series of Angularjs Tutorial focused on Angularjs 2 Interview Questions with detailed answers. We strongly recommend to go through previous parts to understand the basic details about setup, configuration, creating our first Angularjs 2 Application etc. So, having a look on below Angularjs Tutorials will be helpful.
Angular 4 is out now. We can use Angular 4 to develop applications that are cross platform with maximum speed and performance. More on Angular 4 here.

More Advanced Angularjs Tutorial List
- Angularjs 2 Interview Questions - Part 1
- Top 20 Angularjs 1.x Interview Questions and Answers
- Creating Your First SPA application using AngularJS and Web API - All CRUD Operations
- Hybrid Mobile Application Development with PhoneGap, AngularJS and Bootstrap
- jQuery Vs AngularJS
- AngularJS Vs ReactJS Vs Knockout Vs Backbone Vs Ember
Angularjs 2 Interview Questions in Series
- What are the Templates in Angularjs 2? Give a practical example of using Templates in angular2 with source code.
- Explain the Angular2 data binding concepts including property binding, class binding, style binding and event binding with appropriate example and source code.
- Define Forms in angular2? Create a basic Registration Form in Angular2 with fields as Username, Password, FirstName, LastName, Phone Number, Email. Apply the basic form validation too.
- What is dependency Injection w.r.t Angular2? Describe how to use D.I in Angular2 with the help of an example.
- What are Services in Angular2? How to make a Service to Dis ribute Data? Explain with an example.
- How to make an HTTP Request in Angular2? Give a proper example of making an HTTP request using Angular2.
- Create a basic example of implementing AutoComplete in Angular2?
- What is System Js in Angular2? How to config System Js in Angular 2? Please elaborate in detail.
- How to use @HostListener Decorator to implement an infinite scrolling?
- How to implement End2End testing using Angular cli?
What are the Templates in Angularjs 2? Give a practical example of using Templates in angular2 with source code.
Templates in Angular2:
Simply the HTML for each component is the template in Angular2. There are not too much difference between template in Angular2 and the template in Angular 1.x. However, there are significance changes in syntax due to most of the Angular 1.x core directive such as ng-Controller, ng-change, ng-model has been changed in the template in Angular2.
Earlier, in Angularjs 1.x the template used to look like as following, it required ng-app to map to the Angularjs application. Ng-controller was required to map to respective controller. However, now both of these directives are not used in Angular2.
However, in Angular2, each component can have in-line template using ’template’ or can have a template html file using ‘templateUrl’. For example, in Figure for component given earlier, the html template for app.component.ts is app.component.html file in the same folder.
Now if we want to render a simple text. So in our AppComponent, we have taken a variable named ‘title’ and the template url of AppComponent is app.component.html.
|
1 2 3 |
<h1> {{title}} </h1> |
We can also develop the same page using template in component as following:
Both of the case the output would be as following:
Some Syntax for Template in Angular 2
- RENDERING VARIABLE USING {{ }}
Curly brackets are used to render any variable defined in component.
|
1 2 3 |
<h1> {{title}} </h1> |
- BINDING PROPERTY USING [ ]
Square brackets are used to bind to any property. For example, in the first example here the value of the <input> has been bind to the variable called ‘myName’.
|
1 2 3 4 5 |
<input type="text" name="name" id="name" [value]="myName"> <button [disabled]="isdisabled" class="btn-primary"> Click!</button> <div [ngClass] = "{'panel-success': isdisabled}"> Hello </div> |
Therefore, output would look like.
In all three example, [] has been used to bind to any property of the html tag.
- EVENT HANDLING USING ()

Output: For every change in the input field, the increment method will increase the value of the variable val by 1.

- TWO-WAY DATA BINDING Using [()]:
The ng-model directive of Angularjs 1.x has been replaced by [(ngModel)] where [ngModel] and (ngModelChange) has been combined. This is used for two way data bindings.
- * for Directive DOM
In the following example, * has been used for ngFor
123<div *ngFor="let friend of friends"><my-friend [friend]="friend"> </my-friend></div> - Some Invalid expression in Angular 2:
The following expression are invalid in Angularjs 2.0 .
(=) (+=) ( -=) (new ) (;) (,) (++) (–) (|) (&)
| is used for Pipe reason, therefore (|) is an invalid expression.
Back to top
Explain the Angular2 data binding concepts including property binding, class binding, style binding and event binding with appropriate example and source code.
Angularjs 2 Data Binding:
Usually Angular supports two different type of data binding, such as:
- One Way data binding
- Two Way data binding
One way Data Binding:
One way binding is usually used to render any variable on template which has been declared in component. {{}}, curly brackets are used for data rendering. This is a one-way binding as the variable is managed in component.
One way binding is also used for property binding,for example, hidden attribute of <span> element.
|
1 |
<span class="sample" [hidden]="!name">Hello {{name}}!</span> |
Two way Data Binding:
In combination of property binding and event binding, in Angular 2.0 two way data binding has been performed.
In order to make a change in Component from template, event binding is used to emit a function and performed the event.
The change in component is reflected in view / template is performed by property binding.
|
1 |
<input type="text" [ngModel]="name" placeholder="Enter a name here" (ngModelChange)="name=$event"> |
This two way databinding can be also achived by using [ngModel] to the input property and (ngModelChange) event to output property, these two angular core directives set the value of the ‘name’ variable and listen to the expected events on componentsin order to reflect the change of the variable in template to component.
|
1 |
<input type="text" [value]="name" placeholder="Enter a name here" (input)="name=$event.target.value"> |
Here the property [value] has been set to the variable name, and (input) event updates the value of the name variable as the input value changes.
Two–way data binding can also be possible by combining [property-binding] and (event-binding) through another directive [(ngModel)] to implement two-way data binding.
|
1 |
<input type="text" [(ngModel)]="name" placeholder="Enter a name here"> |
What is Property Binding?
In the first example, the value property of the <input> HTML component has been bind to the variable ‘name’. OnInput of <input> the variable name will be changed to the input event’s target value given as input by the user. [ ] has been used for property binding and ( ) has been used for function binding.
|
1 2 3 |
<h2> value property of Input text </h2> <input [value]="name" (input)="name=$event.target.value" > <span> Hi {{name}}</span> |
The output is as following:
The second example, shows how the attribute of any button can be bind in AngularJs 2.0.
The common format to bind attribute is as following
[attr.<attribute name>]=”variable Name”
For example, here the tooltip/title for the button has been set to the variable ‘actionName’.
|
1 2 |
<h2> aria-label & title attribute of button</h2> <button [attr.aria-label]="actionName" [attr.title]="actionName">{{actionName}} with Aria</button> |
 We can pass variable from one component to another component. Here the preant component is passing friend variable as a input to my-friend component.
|
1 2 3 |
<div *ngFor="let friend of friends"> <my-friend [friend]="friend"> </my-friend> </div> |
Summarized Example:
| Target | Example |
| Attribute | <button [attr.title]=”actionName”>{{actionName}} with Aria</button> |
| Property of a HTML element | <input [value]=”name” > |
| Property of a Component | <my-friend [friend]=”friend”> </my-friend> |
What is Class Binding?
For example, if we want to have a div with class ‘panel-primary’ if a variable isprimary is true, otherwise the class for the div would be ‘panel-success’.
|
1 |
<div class="panel" [class.panel-primary]="isprimary" [class.panel-success]="!isprimary"> |
So the format of class binding is as following
|
1 |
<div [class.<className>]=”Boolean condition or variable or expressation”] > </div> |
 Now if we change the variable isprimary = false;
The output would be:
What is Style Binding?
For example, if we want to have a div with text color red if a variable isprimary is true, otherwise the color for the div would be ‘green’.
|
1 |
<div [style.color] = "isprimary ? 'red': 'green'">Hello World! <div> |
So the format of class binding is as following:
|
1 |
<div [style.< style attribute name>]=”expressation”] > </div> |
 As here isprimary=true, therefore, output would be as following:
Style binding can be also done by using [ngStyle] as following:
|
1 2 3 4 5 6 7 8 |
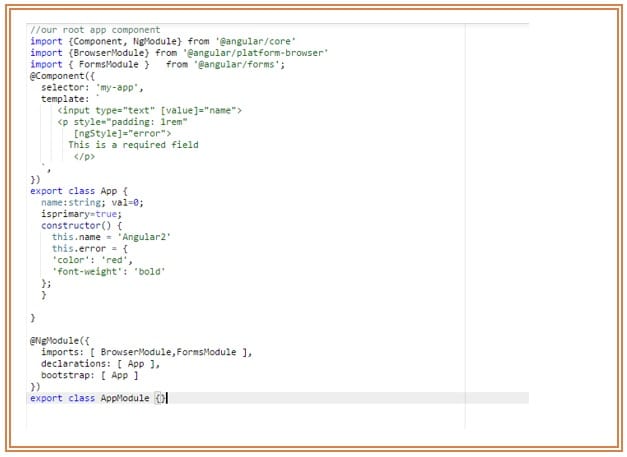
<p style="padding: 1rem" [ngStyle]="{ 'color': 'red', 'font-weight': 'bold', 'borderBottom': borderStyle }"> Hello {{name}} </p> |
ngStyle can be bind to a variable defined in component such as:
|
1 |
<p style="padding: 1rem" [ngStyle]="error"> This is a required field </p> |
Here, error is a variable:
|
1 |
this.error = { 'color': 'red', 'font-weight': 'bold' }; |
 ngStyle can also be bind to function. This way is used for conditional style change. For example, in the following example, if the variable ‘isprimary’ is true the changeColor() method will return success variable as style object otherwise it will return error style object defined earlier in the same component.
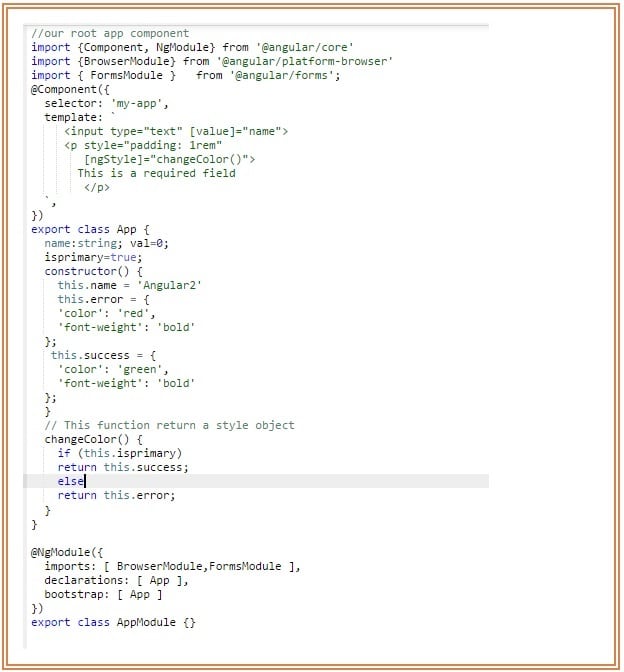
What is Event Binding?
Event binding with Angular 2.0 is much easier and there are lot of stuff could be done.
- Call a simple event from the component by clicking the button.
1<button (click)="changeBgColorToGreen()">Change Color</button> - It is also possible to pass any parameter to the even.
And in the component:1<button (click)="changeBgColor (‘lime’)">Lime</button>
123changeColor(color:string){this.currentcolor= color;} - This is possible to detect which event has been triggered from component. It is also possible to detect which kind of event it is.
There are different kind of event those could be triggered directly from the HTML element. Here both and mouseleave action trigger the same event. However if we want to change the class based on these two different events. For example, on-mouseenter the div will be of red color and on-mouseleave the color will be green.12345678910111213141516171819<div class="card-panel" [style.height]="450+ 'px'" [style.width]="450+'px'" [style.padding]="30+'px'" [className]="currentcolor" [style.margin]="30+'px'"(mouseenter)="onMouseEvent($event)"(mouseleave)="onMouseEvent($event)"(mousemove)="onMouseMove($event)"on-click="onClickEvent($event)"on-dblclick="onClickEvent($event)"></ div >onMouseEvent(event:MouseEvent) {this.x = event.clientXthis.y = event.clientY;if(event.type === 'mouseenter'){this.currentcolor= 'red';}else if(event.type === 'mouseleave'){this.currentcolor= 'green';}} - Another important feature of Event binding is EventEmitter, which enables to multiple components to share events real time.
Define Forms in angular2? Create a basic Registration Form in Angular2 with fields as Username, Password, FirstName, LastName, Phone Number, Email. Apply the basic form validation too.
With Angular1, form was completely template based and every functionality need to be e implemented separately for form validation. However, in AngularJs 2.0 the new helper Class called FormBuilder helps to explicitly declare forms in respective component. FormBuilder also provides a set of form control’s validators for basic validation. If there is any advanced validation is required it is possible to create a new validators. FormBuilder has another cool feature which is asynchronous validation. Use case, like if we need to know if the username is already in the system, we can use this asynchronous validation to send a HTTP request to database to check the availability of the username.
In our example we are going to develop a basic Registration Form in Angular2 with fields as Username, Password, FirstName, LastName, Phone Number, Email.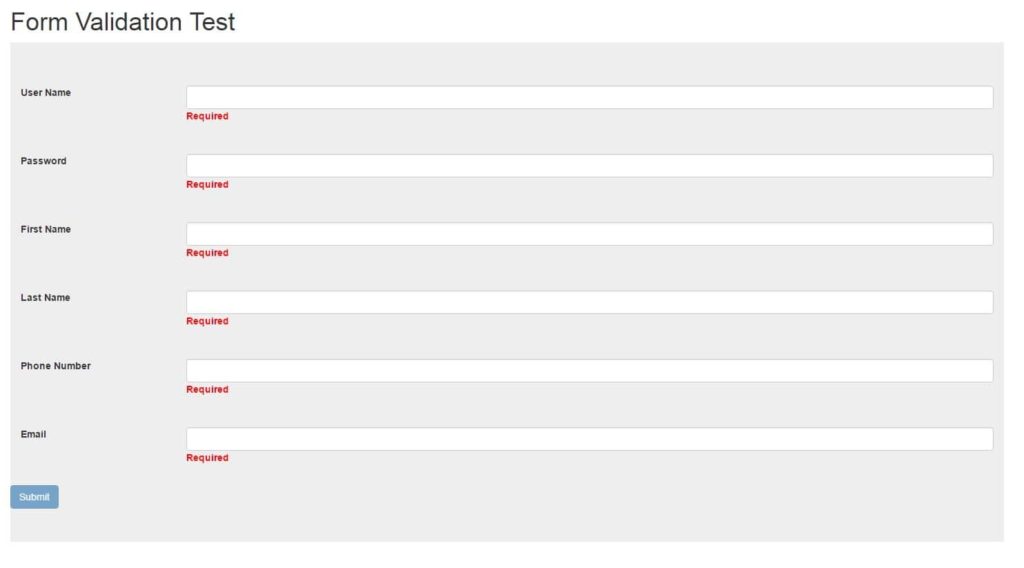
- Import FormsModule and ReactiveFormsModule in AppModule.
1234567891011121314151617181920import { BrowserModule } from '@angular/platform-browser';import { NgModule } from '@angular/core';import { FormsModule , ReactiveFormsModule } from '@angular/forms';import { HttpModule } from '@angular/http';import {RegistrationFormComponent} from './components/registration.form.component'import { AppComponent } from './app.component';@NgModule({declarations: [AppComponent,RegistrationFormComponent],imports: [BrowserModule,FormsModule, ReactiveFormsModule,HttpModule],providers: [],bootstrap: [AppComponent]})export class AppModule { } - Lets create the template registration.component.html.
Therefore, in the component there would be a variable called ‘registrationForm’ and a method called registerUser. Next step is that for each field, we create a new Formontrol as following for username, we have to create a form Control in component called ‘userName’. Also add errorMessage.123<form [formGroup]="registrationForm" (submit)="registerUser()" class="jumbotron"></form>
1234567<div class="form-group row"style="padding:15px; "><label for="name" class="col-xs-2 col-form-label">User Name</label><div class="col-xs-10"><input type="text" id="name" class="form-control" formControlName="userName"/><div [hidden]="userName.dirty && userName.valid"class="errorMessage">Required</div></div></div>12345678910111213141516171819202122232425262728293031323334353637383940414243444546<form [formGroup]="registrationForm" (submit)="registerUser()" class="jumbotron"><div class="form-group row"style="padding:15px; "><label for="name" class="col-xs-2 col-form-label">User Name</label><div class="col-xs-10"><input type="text" id="name" class="form-control" formControlName="userName"/><div [hidden]="userName.dirty && userName.valid"class="errorMessage">Required</div></div></div><div class="form-group row" style="padding:15px; "><label for="password" class="col-xs-2 col-form-label">Password</label><div class="col-xs-10"><input type="password" id="password" type="password" formControlName="password"class="form-control"/><div [hidden]="password.dirty && password.valid" class=" errorMessage">Required</div></div></div><div class="form-group row"style="padding:15px; "><label for="firstname" class="col-xs-2 col-form-label" >First Name</label><div class="col-xs-10"><input type="text" id="firstname" formControlName="firstName" class="form-control"/><div [hidden]="firstName.dirty && firstName.valid"class=" errorMessage">Required</div></div></div><div class="form-group row"style="padding:15px; "><label for="lastname" class="col-xs-2 col-form-label">Last Name</label><div class="col-xs-10"><input type="text" id="lastname" formControlName="lastName" class="form-control"/><div [hidden]="lastName.dirty && lastName.valid" class=" errorMessage">Required</div></div></div><div class="form-group row"style="padding:15px; "><label for="phoneNumber" class="col-xs-2 col-form-label">Phone Number</label><div class="col-xs-10"><input id="phoneNumber" type="text" formControlName="phoneNumber" class="form-control"/><div [hidden]="phoneNumber.dirty && phoneNumber.valid" class=" errorMessage">Required</div></div></div><div class="form-group row"style="padding:15px; "><label for="emailV" class="col-xs-2 col-form-label">Email</label><div class="col-xs-10"><input id="emailV" type="email" formControlName="email" class="form-control"/><div [hidden]="email.dirty && email.valid" class="errorMessage">Required</div></div></div><button type="submit" [disabled]="!registrationForm.valid" class="btn btn-primary" >Submit</button></form> - Build the form in component.
=> Import FormGroup, Validators,FormControl from @angular/forms1234567891011121314151617181920212223242526272829303132333435363738394041import { Component,OnInit,Input, } from '@angular/core';import {ValidationFormService} from './../services/validation.form.service'import {FormGroup, Validators,FormControl } from '@angular/forms';@Component({selector: 'form-holder',templateUrl: './registration.form.component.html',styleUrls: ['./registration.form.css'],providers: [ValidationFormService]})export class RegistrationFormComponent implements OnInit {title = 'Form Validation Test ';registrationForm: FormGroup;errorMessage:string;userName= new FormControl('', [ValidationFormService.userNameValidator, Validators.required, Validators.minLength(3), Validators.maxLength(80)]);password=new FormControl('', [Validators.required, Validators.minLength(3), Validators.maxLength(80)]);firstName=new FormControl('', [Validators.required, Validators.minLength(3), Validators.maxLength(80)]);lastName=new FormControl('', [Validators.required]);phoneNumber=new FormControl('', [Validators.required, Validators.minLength(3), Validators.maxLength(80)]);email: FormControl=new FormControl('', [Validators.required, Validators.minLength(3), Validators.maxLength(80)]);submitAttempt: boolean = false;constructor (private _validationFormService: ValidationFormService) {this.registrationForm = new FormGroup({userName:this.userName,password:this.password,firstName:this.firstName,lastName:this.lastName,phoneNumber:this.phoneNumber,email: this.email});}ngOnInit() { }registerUser () {this.submitAttempt = true;}}
=> Define the formControl for each field such as username, password, firstName,lastname,email and phoneNumber.- Single Validator:
1lastName=new FormControl('', [Validators.required]); - Composite Validator: This is also possible to combine more than one validator. For exmaple,
123456789101112firstName=new FormControl('', [Validators.required, Validators.minLength(3), Validators.maxLength(80)]);Build the formGroup using all the controllersthis.registrationForm = new FormGroup({userName:this.userName,password:this.password,firstName:this.firstName,lastName:this.lastName,phoneNumber:this.phoneNumber,email: this.email}); - Single Validator:
- Create custom validation. For, example, if we want to check if the email format is valid or not.
- Lets create a validation service class
- And inject that ValidationFormService service to RegistrationFormComponent
1234567891011import { Component,OnInit,Input, } from '@angular/core';import {ValidationFormService} from './../services/validation.form.service'import {FormGroup, Validators,FormControl } from '@angular/forms';@Component({selector: 'form-holder',templateUrl: './registration.form.component.html',styleUrls: ['./registration.form.css'],providers: [ValidationFormService]})export class RegistrationFormComponent implements OnInit { } - Create the method for validation in ValidationFormService.
12345678static emailValidator(control: FormControl) {if (control.value.match(/[a-z0-9!#$%&'*+/=?^_`{|}~-]+(?:\.[a-z0-9!#$%&'*+/=?^_`{|}~-]+)*@(?:[a-z0-9](?:[a-z0-9-]*[a-z0-9])?\.)+[a-z0-9](?:[a-z0-9-]*[a-z0-9])?/)) {return null;} else {return { 'invalid': true };}} - Add the validator to email formControl.
1email: FormControl=new FormControl('', [ValidationFormService.emailValidator, Validators.required, Validators.minLength(3), Validators.maxLength(80)]);
More Angularjs 2 Interview Questions and Answers:
What is dependency Injection w.r.t Angular2? Describe how to use D.I in Angular2 with the help of an example.
In order to inject any service later in any of the component, the service class needs to be declared as @Injectable.
|
1 2 3 4 |
import {Injectable} from '@angular/core'; @Injectable() export class DataService { } |
- Create a method in DataService that will return the nth Day of the week, where n is the input number from 1 to 7.
1234567891011121314151617181920212223import {Injectable} from '@angular/core';@Injectable()export class DataService {WEEK_DAYS:Array<any>;constructor() {this.WEEK_DAYS = [{ name: 'MonDay'},{ name: 'TuesDay' },{ name: 'WednesDay' },{ name: 'ThursDay' },{ name: 'FriDay'},{ name: 'SatureDay'},{ name: 'SunDay' }];}getdaysOfWeek(value:number) {return this.WEEK_DAYS[value-1];}}
The next step is to inject the service to any component by declaring the service as providers.
- Add providers in AppComponent’s metadata.

Now, if there is an instance of the service inside component, the component can access any service provide by DataService class through the instance of it. - Add the DataService variable in the constructor of the App Component.

- Call the service from app component.
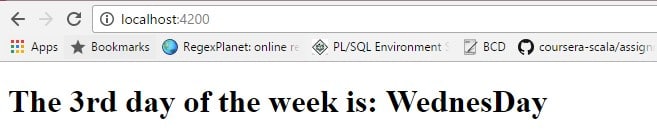
1234constructor (private _dataRequestService: DataRequestService, private _dataService: DataService) {this.day =_dataService.getdaysOfWeek(3);this.title2 = 'The 3rd day of the week is: ' + this.day.name;}
Any method from DataService class can be accessible from appComponent with it’s instance.
77 lectures, 14.5 Hours Video, All Levels
- Your First Angular Website
- Web Template Store
- myContacts App
- ngSocial Facebook App
- Job Directory
- KnowledgeBase
- User Authentication App
- Instagram Gallery
- PubNub Chat
- AutoFind
And also we will find Quiz at the end of each application to verify the skill improvement.
What are Services in Angular2? How to make a Service to Dis ribute Data? Explain with an example.
The beauty of the service in angular2 is as it can be injectable to any components. There are some facts of service of Angularjs 2.0 as following:
- Services are singleton. Every component use individual instance of the service.
- Usually the instance of component are created inside the constructor of the component
How to Make a Service to Distribute Data?
For example, if we want to create a DataService and use that Service in App Component.
Example 1: Use a service to determine the nth day of the week. Here n = 1,2,3,4,5,6 and 7.
The steps in order to use a service is as following:
- Create a new class called ‘DataService’ and save the file as data.service.ts.
- Make the new class @Injectable.
123456import {Injectable} from '@angular/core';@Injectable()export class DataService {} - Create a new methods getalldays() to get all the days of the week and getdaysofweek to get a particular day of the week.
123456789101112131415161718192021222324import {Injectable} from '@angular/core';@Injectable()export class DataService {WEEK_DAYS:Array<any>;constructor() {this.WEEK_DAYS = [{ name: 'SatureDay'},{ name: 'SunDay' },{ name: 'MonDay'},{ name: 'TuesDay' },{ name: 'WednesDay' },{ name: 'ThursDay' },{ name: 'FriDay'}];}getalldays() {return this.WEEK_DAYS;}getdaysOfWeek(value:number) {return this.WEEK_DAYS[value+1];}} - Import DataService In AppComponent.
- Add providers in AppComponent’s metadata.
- Add the dataservice variable in the constructor of the App Component.
- Call the getdayofweek method of DataService.
123456789101112131415161718import { Component,OnInit } from '@angular/core';import { DataService } from './data.service';@Component({selector: 'app-root',templateUrl: './app.component.html',styleUrls: ['./app.component.css'],providers: [DataService]})export class AppComponent {title = 'The 3rd day of the week is: ';day:any;constructor (private _dataService: DataService) {this.day =_dataService.getdaysOfWeek(3);this.title = this.title + this.day.name;}} - The output would be as following:
How to make an HTTP Request in Angular2? Give a proper example of making an HTTP request using Angular2.
For example, lets call a Rest API get call from App Component. In order to serve this purpose, we have to create a new service and inject that in AppComponent.
Create a Service to access HTTP Request:
- Create a file called src/app/data.request.service.ts.
- Import necessary libraries.
123import {Http, Response} from '@angular/http';import {Observable} from 'rxjs/Observable';import 'rxjs/add/operator/map';- As service need to be injected in components, therefore several Web service dependencies such as Http, Response would be required.
- Http Request need to be async and change in real time, therefore, we would also need Observable or Promise.
- Declare the service class as @Injectable.
- Initialize the constructor of the new service with HTTP Object.
12constructor(private http: Http) {} - Create a method that will take the response of the HTTP Request as input and convert it to JSON.
123456// return the response as json objectprivate formatData(res: Response) {let body = res.json();console.log("result"+res.json());return res.json();} - Create a method to handle the error message for the response of the HTTP request.
12345// error messageprivate handleError(error: any) {let errMsg = (error.message) ? error.message : error.status ? `${error.status} - ${error.statusText}` : 'Server error';return Observable.throw(errMsg);} - Make the http GET Request
Here map will call formatData Method and convert the response to json object. Catch will be called if there is any error in this will be delat with the handleError method.12345getAllCountries() {return this.http.get(this.baseurl+'all').map(this.formatData).catch(this.handleError);}
Update app.module.js:
In app.module.ts add we need to import HttpModule:
|
1 2 3 4 5 |
import {HttpModule} from "@angular/http"; @NgModule({ imports: [ BrowserModule , HttpModule], ... }) |
Inject Service in Appcomponent:
- DataRequestService’ is imported in AppComponent.
- Component decorator’s providers metadata has ‘DataRequestService’.
- In the constructor of the component, a variable ‘_dataRequestService’ of type ‘DataRequestService’ Service’ has been declared. This variable will be used to use any method of type ‘DataRequestService’ Service’.
- AppComponent has an observable variable called ‘countries that stores the response of the API call.
- Then, inside ngOnInit(), the method has been called.
- The Observable has been subscribed here in method getAllCountries(). In subscribing there are three distinctive callbacks: the first receive the response as new value for @Input countries, the second one is for any errors and the last one is used to represent the function to be invoked when the sequence of incoming data is complete and the HTTPs request is successful.
|
1 2 3 4 5 6 7 8 9 10 11 12 13 14 15 16 17 18 19 20 21 22 23 24 25 26 |
import { Component,OnInit,Input } from '@angular/core'; import { DataRequestService } from './data.request.service'; @Component({ selector: 'app-root', templateUrl: './app.component.html', styleUrls: ['./app.component.css'], providers: [DataRequestService] }) export class AppComponent implements OnInit { title = 'Http Request Test '; @Input() countries; errorMessage:string; constructor (private _dataRequestService: DataRequestService) { } ngOnInit() { this._dataRequestService.getAllCountries() .subscribe( res => this.countries = res, error => this.errorMessage = error); } } } } |
|
1 2 3 4 5 6 |
<h1> {{title}} </h1> <h2>Name - Capital </h2> <div *ngFor="let country of countries"> {{country.name}} - {{country.capital}} <hr/> </div> |

Create a basic example of implementing AutoComplete in Angular2?
In order to implement we have to follow the following steps:
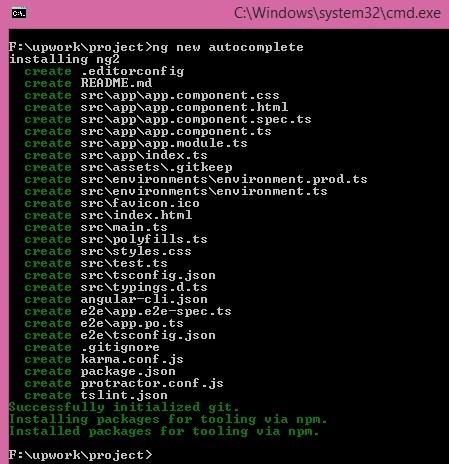
- Open command prompt run ‘ng new autocomple’ command to create a new project called ‘autocomplete’.
- Go to autocomplete folder and run ‘ng serve’ and from browser run ‘http://localhost:4200’.The web page will look like:

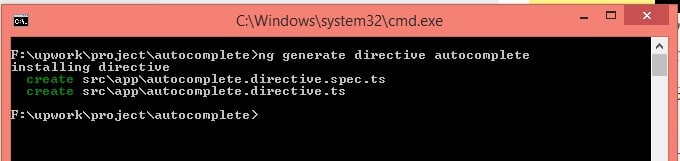
- In a separate command window Create a new directive called Autocomplete with the command ‘ng generate directive autocomplete’.
1234567891011121314151617181920212223<div class="container" ><div class="row"><div class="col s6"><div class="input-field "><input id="country" type="text" class="validate filter-input" [(ngModel)]=query (keyup)=filter()><label for="country">Country</label></div><div class="suggestions" *ngIf="filteredList.length > 0"><ul *ngFor="let item of filteredList" ><li ><a (click)="select(item)">{{item.name}}</a></li></ul></div></div><div class="col s6"><h2 [hidden]="country===null"> Selected Country:</h2><pre [hidden]="country===null">{{country | json}}</pre></div></div></div>1234567891011121314151617181920212223242526272829303132333435363738394041424344454647484950515253545556import { Component, OnInit,ElementRef } from '@angular/core';import {CountryService} from "../../services/country.service";@Component({selector: 'app-autocomplete',templateUrl: './autocomplete.component.html',styleUrls: ['./autocomplete.component.css'],providers: [CountryService]})export class AutocompleteComponent implements OnInit {public filteredList = [];public elementRef;constructor(myElement: ElementRef,private _countryService:CountryService) {this.elementRef = myElement;}public countries :Array<any>;errorMessage:string;query:string;country:any;ngOnInit() {this._countryService.getAllCountries().subscribe(res => this.countries = res,error => this.errorMessage = error);}filter() {this._countryService.searchCountries(this.query).subscribe(res => this.filteredList = res,error => this.errorMessage = error);}select(item){//this.query = item;this.filteredList = [];this.country =item;}handleClick(event){var clickedComponent = event.target;var inside = false;do {if (clickedComponent === this.elementRef.nativeElement) {inside = true;}clickedComponent = clickedComponent.parentNode;} while (clickedComponent);if(!inside){this.filteredList = [];}}} - Create a new service with the command ‘ng generate service country’.

1234567891011121314151617181920212223242526272829303132333435363738394041import { Injectable } from '@angular/core';import {Http, Response} from '@angular/http';import {Observable} from 'rxjs/Rx';import 'rxjs/add/operator/map';import 'rxjs/add/operator/catch';@Injectable()export class CountryService {countries: Array<any>;constructor(private http: Http) {}private baseurl = 'https://restcountries.eu/rest/v1/'; // URL to web APIgetAllCountries() {return this.http.get(this.baseurl+'all').map(this.formatData).catch(this.handleError);}searchCountries(query:string) {return this.http.get(this.baseurl+'name/'+query).map(this.formatData).catch(this.handleError);}// return the response as json objectprivate formatData(res: Response) {let body = res.json();return res.json();}// error messageprivate handleError(error: any) {let errMsg = (error.message) ? error.message : error.status ? `${error.status} - ${error.statusText}` : 'Server error';return Observable.throw(errMsg);}}
Finally output would be:
If we select one item from the dropdown: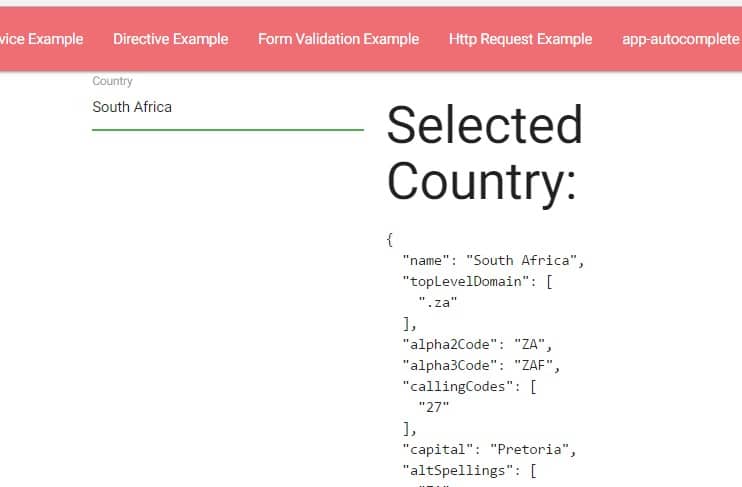
Back to top
Angular 4 is out now. We can use Angular 4 to develop applications that are cross platform with maximum speed and performance. More on Angular 4 here.
What is System Js in Angular2? How to config System Js in Angular 2? Please elaborate in detail.
What is System Js in Angular2?
The role of systemJs in angular 2 are as following:
- System.js is universal Module loader. This is very popular as module loader for loading ES6, AMD, CommonJS and any other global scripts in the browser and NodeJS. Once this plugin loads the required module, typescript.js can compile TypeScript code on-the-fly into ES5 in browser.
- This is mainly a mapping configuration file to find out the library file location
- CONFIG API (https://github.com/systemjs/systemjs/blob/master/docs/config-api.md) helps to config different system config parameter in order to load different modules from different location.
How to Config System Js in Angular2?
Initialize a Project:
- Create a new folder called ‘helloworld’.
- Run npm init command as following:
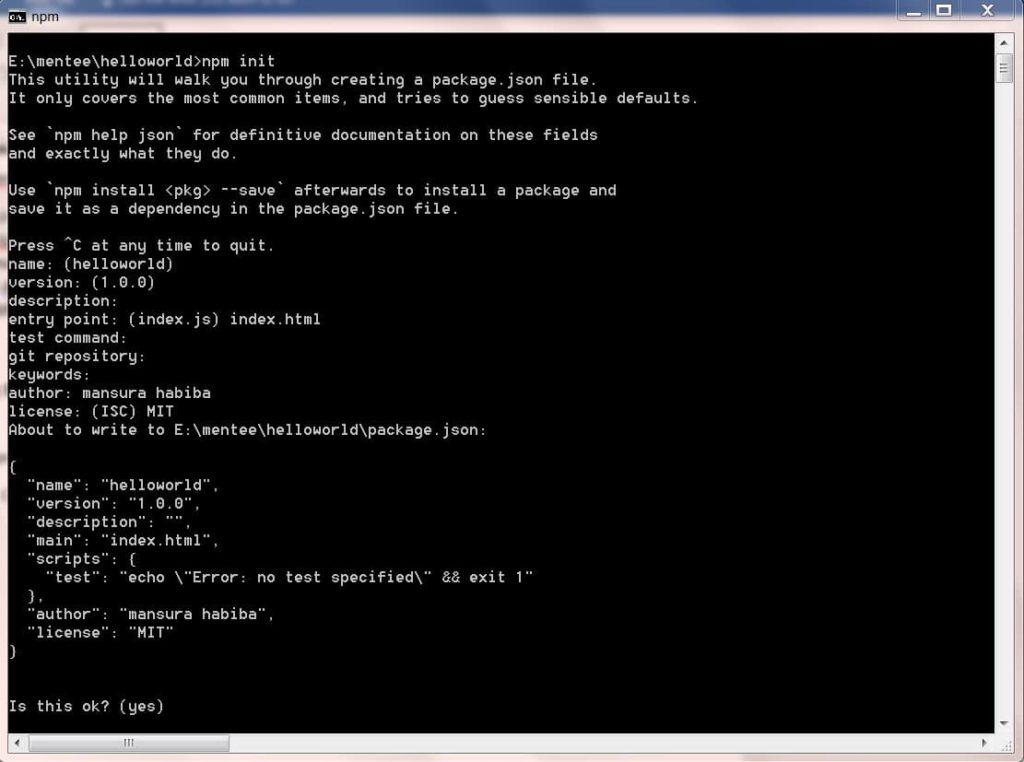
- This will create package.json with the following format:
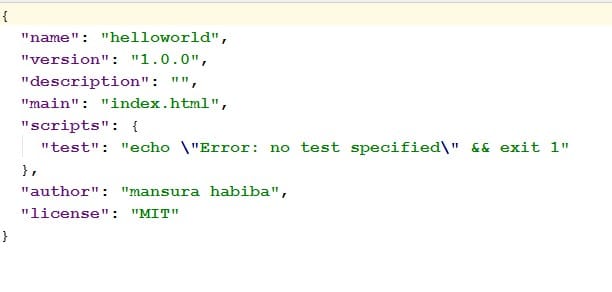
So at this moment we have the project name ‘helloworld’ and some basic information such as license, author and so on. - However, for an angularjs 2.0 project we need some more configuration. For example, firstly, we need the core dependencies. A minimum valid list of dependencies could be as following:
123456789101112131415161718"dependencies": {"@angular/common": "~2.1.0","@angular/compiler": "~2.1.0","@angular/core": "~2.1.0","@angular/forms": "~2.1.0","@angular/http": "~2.1.0","@angular/platform-browser": "~2.1.0","@angular/platform-browser-dynamic": "~2.1.0","@angular/router": "~3.1.0","@angular/upgrade": "~2.1.0","angular-in-memory-web-api": "~0.1.5","bootstrap": "^3.3.7","core-js": "^2.4.1","reflect-metadata": "^0.1.8","rxjs": "5.0.0-beta.12","systemjs": "0.19.39","zone.js": "^0.6.25"} - Next it requires some additional dependencies to compile and deploy for typescript as following:
1234"devDependencies": {"concurrently": "^3.0.0","typescript": "^2.0.3"} - On script we need to add the command for continuous ts compilation
Everytime, ‘npm run’ command will be executed, the tsc command will be triggered and this will compile the TS code into JS code. ‘ tsc -w’ is watcher which will continue to listen for any changes in project’s TS code to compile.1234"scripts": {"start": "tsc && concurrently \"tsc -w\" ","test": "echo \"Error: no test specified\" && exit 1"} - Therefore, finally the package.json would look like as following:
12345678910111213141516171819202122232425262728293031323334353637{"name": "helloworld","version": "1.0.0","description": "","main": "index.html","scripts": {"start": "tsc && concurrently \"tsc -w\" webpack-dev-server --inline -- progress --port 8080 ","test": "echo \"Error: no test specified\" && exit 1"},"author": "mansura habiba","license": "MIT",// add the deedendencies"dependencies": {"@angular/common": "~2.1.0","@angular/compiler": "~2.1.0","@angular/core": "~2.1.0","@angular/forms": "~2.1.0","@angular/http": "~2.1.0","@angular/platform-browser": "~2.1.0","@angular/platform-browser-dynamic": "~2.1.0","@angular/router": "~3.1.0","@angular/upgrade": "~2.1.0","angular-in-memory-web-api": "~0.1.5","bootstrap": "^3.3.7","core-js": "^2.4.1","reflect-metadata": "^0.1.8","rxjs": "5.0.0-beta.12","systemjs": "0.19.39","zone.js": "^0.6.25"},// development dependencies"devDependencies": {"concurrently": "^3.0.0","typescript": "^2.0.3"}} - Run ‘npm install’ at the root folder of the project, this will install all required libraries.
Install Typings:
- Install typings using the ‘ npm install typings -global’ command on command prompt.
- Now we need a config file for additional configuration need to be performed by Typescript compiler. For example, we need to add core, jasmine and node to the project. In order to perform the task,
- Run ‘typings install dt~core-js -global -save’ command.

This command will install typings and create typings.json file in the root folder of the project.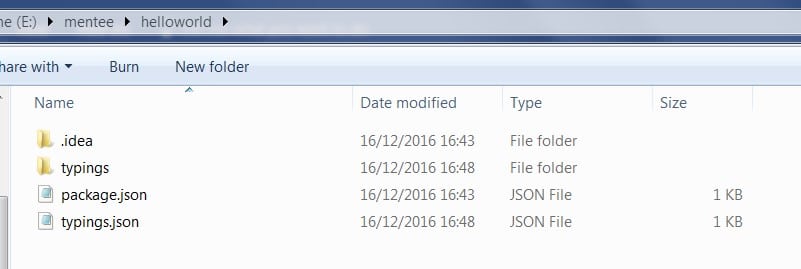
At the moment, typings.json file will look like this:
- Run ‘typings install dt~jasmine -global -save’ command.

- Check if there is any available update by running this command ‘typings install dt~node -global -save’.

If there is any update available, this will look like as following - Run following command to get the updates
At this moment, typings.json file will look as following:1E:\...\helloworld\npm i -g typings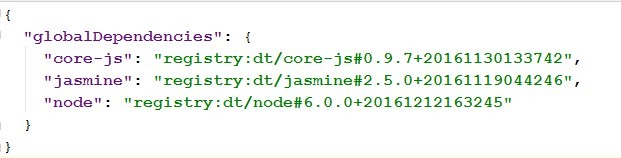
- Run ‘typings install dt~core-js -global -save’ command.
Setup the Typescript Compiler:
The next step is to create tsconfig.json file at the root folder of the project. tsconfig.json is used to configure TypeScript compiler in order to compiles TypeScript code of project to JavaScript.
Create Systemjs.config.js file:
- Create a new file at the root folder of the project called systemjs.config.js. For now we can take a sample file from Angularjs 2.0 Plunker . In this config file, there are a number of properties need to be configured.
123456789101112131415161718192021222324252627282930313233343536373839404142434445(function (global) {System.config({transpiler: 'typescript',typescriptOptions: {emitDecoratorMetadata: true},paths: {'npm:': 'node_modules/'},map: {app: './src','@angular/core': 'npm:@angular/core/bundles/core.umd.js','@angular/common': 'npm:@angular/common/bundles/common.umd.js','@angular/compiler': 'npm:@angular/compiler/bundles/compiler.umd.js','@angular/platform-browser': 'npm:@angular/platform-browser/bundles/platform-browser.umd.js','@angular/platform-browser-dynamic': 'npm:@angular/platform-browser-dynamic/bundles/platform-browser-dynamic.umd.js','@angular/http': 'npm:@angular/http/bundles/http.umd.js','@angular/router': 'npm:@angular/router/bundles/router.umd.js','@angular/forms': 'npm:@angular/forms/bundles/forms.umd.js','@angular/core/testing': 'npm:@angular/core/bundles/core-testing.umd.js','@angular/common/testing': 'npm:@angular/common/bundles/common-testing.umd.js','@angular/compiler/testing': 'npm:@angular/compiler/bundles/compiler-testing.umd.js','@angular/platform-browser/testing': 'npm:@angular/platform-browser/bundles/platform-browser-testing.umd.js','@angular/platform-browser-dynamic/testing': 'npm:@angular/platform-browser-dynamic/bundles/platform-browser-dynamic-testing.umd.js','@angular/http/testing': 'npm:@angular/http/bundles/http-testing.umd.js','@angular/router/testing': 'npm:@angular/router/bundles/router-testing.umd.js','rxjs': 'npm:rxjs','typescript': 'npm:typescript/lib/typescript.js'},packages: {app: {main: './main.ts',defaultExtension: 'ts'},rxjs: {defaultExtension: 'js'}}});})(this);
Configure System Js in index.html:
Create index.html in src folder:
|
1 2 3 4 5 6 7 8 9 10 11 12 13 14 15 16 17 18 19 20 |
<html> <head> <title>SystemJS Test</title> <meta charset="UTF-8"> <meta name="viewport" content="width=device-width, initial-scale=1"> <link rel="stylesheet" href="styles.css"> <script src="node_modules/core-js/client/shim.min.js"></script> <script src="node_modules/zone.js/dist/zone.js"></script> <script src="node_modules/reflect-metadata/Reflect.js"></script> <script src="node_modules/systemjs/dist/system.src.js"></script> <!-- Configure SystemJS --> <script src="systemjs.config.js"></script> <script> System.import('app').catch(function(err){ console.error(err); }); </script> </head> <body> <app-root>Loading...</app-root> </body> </html> |
First add system.config.js
|
1 |
<script src="systemjs.config.js"></script> |
Next import System import with app called ‘app’.
|
1 2 3 |
<script> System.import('app').catch(function(err){ console.error(err); }); </script> |
Create AppComponent:
|
1 2 3 4 5 6 7 8 |
import { Component } from '@angular/core'; @Component({ selector: 'app-root', template: '<h1>Hello from Angular 2 App with SystemJs</h1>' }) export class AppComponent { } |
Create App Module:
|
1 2 3 4 5 6 7 8 9 |
import { NgModule } from '@angular/core'; import { BrowserModule } from '@angular/platform-browser'; import { AppComponent } from './app.component'; @NgModule({ imports: [ BrowserModule ], declarations: [ AppComponent ], bootstrap: [ AppComponent ] }) export class AppModule { } |
Create main.ts:
|
1 2 3 4 |
import { platformBrowserDynamic } from '@angular/platform-browser-dynamic'; import { AppModule } from './app.module'; const platform = platformBrowserDynamic(); platform.bootstrapModule(AppModule); |
WINDOWS ONLYrunnpm install -g webpack webpack-dev-server typings typescriptto install global dependencies.- Run ‘npm start’
- On browser run ‘localhost:8080’

How to use @HostListener Decorator to implement an infinite scrolling?
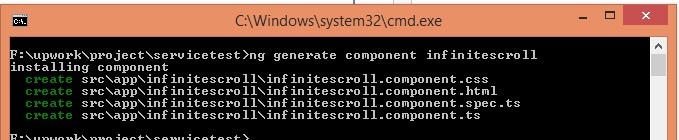
- Create a new component in existing angularjs application called ‘infinitescroll’.
- Import HostListener and Inject to the component.
1import { Component, OnInit ,HostListener , Inject} from '@angular/core'; - Declare the Document, here the target element.
1constructor(@Inject(DOCUMENT) private document: Document ) { } - Implement windowScroll method and bind it to window:scroll event.
HostListener helps to continuously listening for any event trigger.123456789101112131415@HostListener("window:scroll", [])onWindowScroll() {let status = "not reached";let windowHeight = "innerHeight" in window ? window.innerHeight: this.document.documentElement.offsetHeight;let body = this.document.body, html = this.document.documentElement;let docHeight = Math.max(body.scrollHeight,body.offsetHeight, html.clientHeight,html.scrollHeight, html.offsetHeight);let windowBottom = windowHeight + window.pageYOffset;if (windowBottom >= docHeight) {status = 'bottom reached';}console.log("Current status"+status);}
How to implement End2End testing using Angular CLI?
Test Case 1: If we want to test if the getAllCountries() method of CountryService is working properly.
If the service class has been created using ng command from angular cli tool, there would be already related spec class created.
Now in country.service.spec.ts file, we have create the use cases as following:
|
1 2 3 4 5 6 7 8 9 10 11 12 13 |
describe(' Test #getAllCountries() ', () => { it('should return an non empty array by default', inject([CountryService], (service: CountryService) => { expect(service.getAllCountries()); })); }); describe(' Test #searchCountries() ', () => { it('should return 3 countries', inject([CountryService], (service: CountryService) => { expect(service.searchCountries('af')); })); }); |
Now from command line run the command ‘ng test’. A new window will be opened with test status.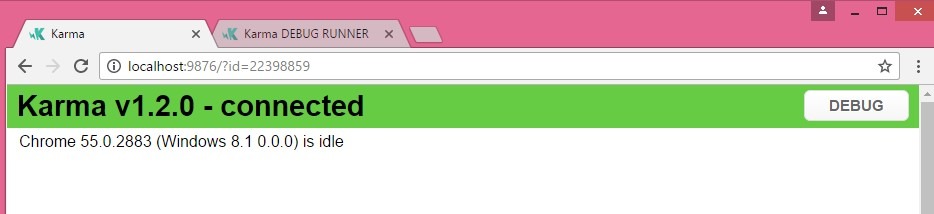
This will show all the errors and warning in console as below: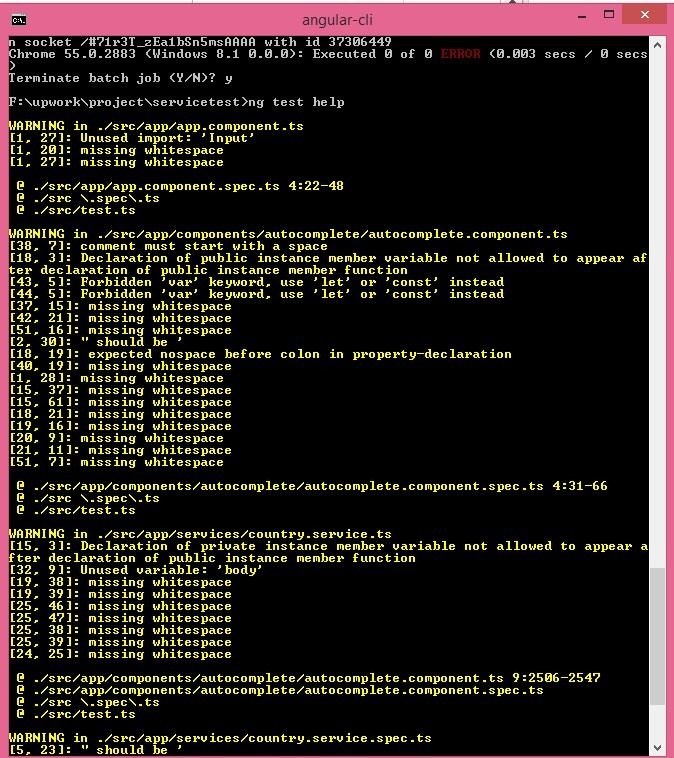
End 2 End Test
For end to end testing Create end-to-end tests in e2e/searchcountry.e2e-spec.ts
|
1 2 3 4 5 6 7 8 9 10 11 12 13 14 15 16 17 18 19 |
import {TestBed, async, inject} from '@angular/core/testing'; import {CountryService} from './country.service'; describe('Search', () => { beforeEach(() => { TestBed.configureTestingModule({ providers: [CountryService] }); }); it('should ...', inject([CountryService], (service: CountryService) => { expect(service).toBeTruthy(); })); it('should have an input and search button', () => { expect(element(by.css('app-root app-search form input')).isPresent()).toEqual(true); expect(element(by.css('app-root app-search form button')).isPresent()).toEqual(true); }); }); |
Run the command is ‘ng e2e’.
Code Coverage
For code coverage run ‘npm run coverage’
The report file will be generated inside ‘coverage’ folder.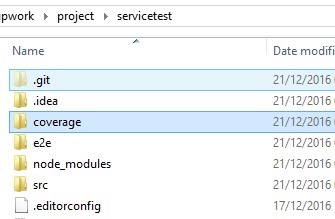
77 lectures, 14.5 Hours Video, All Levels
- Your First Angular Website
- Web Template Store
- myContacts App
- ngSocial Facebook App
- Job Directory
- KnowledgeBase
- User Authentication App
- Instagram Gallery
- PubNub Chat
- AutoFind
And also we will find Quiz at the end of each application to verify the skill improvement.
Concluding Remarks
Hopefully, this Angularjs 2 Tutorial Series will be helpful for developers to understand the technology in more practical way and prepare well for Angularjs Interview Questions.
Top Technical Interview Questions and Answers Series:
- Learn Angular4 - A Complete Guide
- Top 20 AngularJS Interview Questions
- Top 15 Bootstrap Interview Questions
- Top 10 HTML5 Interview Questions
- Top 10 ASP.NET MVC Interview Questions
- Top 10 ASP.NET Web API Interview Questions
- Top 10 ASP.NET Interview Questions
- Comprehensive Series of ASP.NET Interview Questions
- Top 10 ASP.NET AJAX Interview Questions
- Top 10 WCF Interview Questions
- Comprehensive Series of WCF Interview Questions