


Goal of this ASP.NET Web API Tutorial is to develop a simple Expense Management Application that is mainly used to have a track of the expenses that an individual spend on a daily basis. Purpose is more to learn the technology and see the actual code snippets by keeping the application domain simple and straight forward. Technology being used for developing this Expense Management Application is AngularJS 1.x with ASP.NET Web API.
Complete Source Code for the ASP.NET Web API Expense Management Application with AngularJS is now available to download here. You just need to be a REGISTERED Member to download Source Code. Registration is FREE 🙂
Angular 6 is out now. We can use Angular 6 to develop applications that are cross platform with maximum speed and performance. More on Angular 6 here.

The key features are:
- Creating a user-defined Category.
- Creating a expense for a corresponding Category with respect to date.
- See Monthly Report of the expenses.
More ASP.NET Web API | AngularJs and Related Tutorial:
Setting Up ASP.NET Web API Project:
- Create a New Project in Visual Studio 2013 or 2015.

- Create Blank Solutions in Other Project Types under Visual Studio Solutions.

- Add a project into the solution by Right clicking on Solution Name and select Add New Project. Select template as WEB API also ensure that no authentication is selected.

- Add another project for the angular application by repeating the same process, selecting Empty as template.
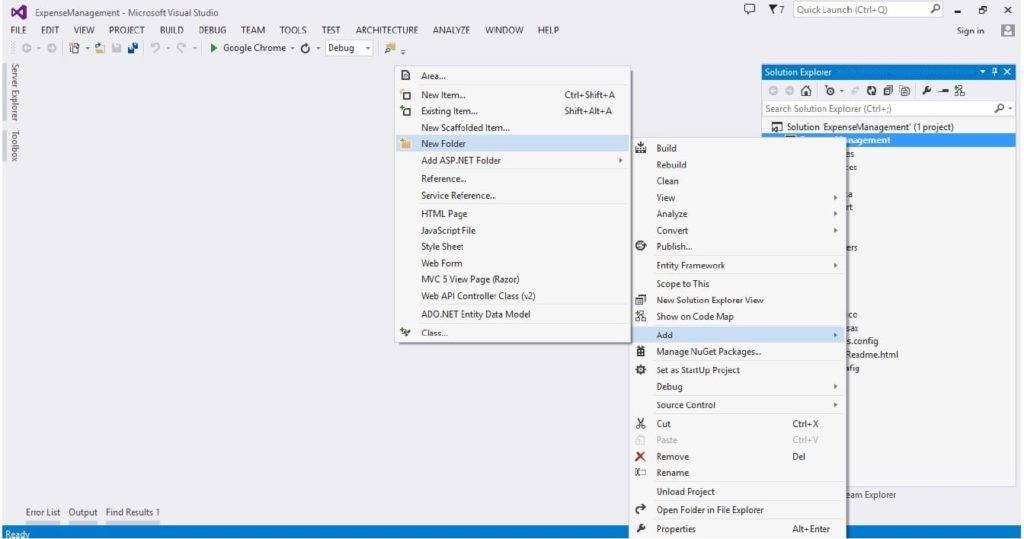
- Add a new folder with name app to have the angular application markup and script files.
- Solution is set ready to work on our ExpenseManagement application.
Front End AngularJs Application:
- Right Click the app folder and create HTML pages and name them as:
- Index.html
- Category.html
- Expense.html
- Report.html
- Replace the following code in the index.html.
12345678910111213141516171819202122232425262728293031323334<html xmlns="http://www.w3.org/1999/xhtml" ng-app="appExpenseManager"><head><title></title><meta name="viewport" content="width=device-width, initial-scale=1.0"> <link href="../Content/bootstrap.css" rel="stylesheet" /><script src="../Scripts/jquery-1.10.2.js"></script> <script src="../Scripts/bootstrap.js"></script> <script src="../Scripts/angular.js"></script> <script src="module.js"></script><script src="../Scripts/angular-route.js"></script> <script src="app.js"></script><script src="../Scripts/chart.js"></script><script src="../Scripts/angular-charts.js"></script></head><body><!-- Navigation --><nav class="navbar navbar-default"><!-- Brand and toggle get grouped for better mobile display --><div class="navbar-header"><button type="button" class="navbar-toggle collapsed" data-toggle="collapse" data-target="#bs-example-navbar-collapse-1" aria-expanded="false"><span class="sr-only">Toggle navigation</span><span class="icon-bar"></span><span class="icon-bar"></span><span class="icon-bar"></span></button><a class="navbar-brand" href="#">Expense Management</a></div><!-- Collect the nav links, forms, and other content for toggling --><div class="collapse navbar-collapse" id="bs-example-navbar-collapse-1"><ul class="nav navbar-nav navbar-right"><li><a href="#/addCategory">Category</a></li> <li><a href="#/addExpense">Expense</a></li> <li><a href="#/report">Report</a></li><li ng-if="user/length>0"><a href="#/home">{{user}}</li> </ul></div><!-- /.navbar-collapse --></nav><div ng-view> </div></body></html> - Replace the following code in the register.html.
12345678910111213141516171819202122232425262728293031323334353637383940414243444546474849505152535455565758<div class="container" ng-controller=""><div class="row"><div class="col-sm-4"></div><div class="col-sm-4"><div class="form-group"><label for="username">User Name</label><input type="email" class="form-control" ng-model="username" placeholder="User Name" id="username"></div></div><div class="col-sm-4"></div></div><div class="row"><div class="col-sm-4"></div><div class="col-sm-4"><div class="form-group"><label for="password">Password</label><input type="password" class="form-control" ng-model="password" placeholder="Password" id="password"></div></div><div class="col-sm-4"></div></div><div class="row"><div class="col-sm-4"></div><div class="col-sm-4"><div class="form-group"><label for="password">Confirm Password</label><input type="password" class="form-control" ng-model="password" placeholder="Pasword" id="password"></div></div><div class="col-sm-4"></div></div><div class="row"><div class="col-sm-4"></div><div class="col-sm-4"><button type="button" id="submit" class="btn form-control btn-primary">Register</button></div><div class="col-sm-4"></div></div></div> - Replace the following code in the login.html.
1234567891011121314151617181920212223242526272829303132333435363738394041424344<div class="container" ng-controller="loginCtrl"><div class="row"><div class="col-sm-4"></div><div class="col-sm-4"><div class="form-group"><label for="username">User Name</label><input type="text" class="form-control" ng-model="username" placeholder="User Name" id="username"></div></div><div class="col-sm-4"></div></div><div class="row"><div class="col-sm-4"></div><div class="col-sm-4"><div class="form-group"><label for="password">Password</label><input type="password" class="form-control" ng-model="password" placeholder="User Name" id="password"></div></div><div class="col-sm-4"></div></div><div class="row"><div class="col-sm-4"></div><div class="col-sm-4"><button type="button" id="submit" ng-click="login()" class="btn form-control btn-primary">Log in</button></div><div class="col-sm-4"></div></div></div> - Replace the following code in the category.html.
1234567891011121314151617181920212223242526272829303132333435363738394041424344454647<div class="row"><div class="col-sm-4"></div><div class="col-sm-4"><hr /></div><div class="col-sm-4"></div></div><div class="row"><div class="col-sm-4 col-sm-offset-4"><span class="page-header text-center"><h1> Add Categories</h1></span></div></div><div class="row"><div class="col-sm-4"></div><div class="col-sm-4"><hr /></div><div class="col-sm-4"></div></div><div class="row"><div class="col-sm-4"></div><div class="col-sm-4"><div class="form-group"><label for="categoryname">Category Name</label><input type="text" class="form-control" ng-model="categoryname" placeholder="Category Name" id="categoryname"></div></div><div class="col-sm-4"></div></div><div class="row"><div class="col-sm-4"></div><div class="col-sm-4"><div class="form-group"><label for="categorydescription">Category Description</label><input type="text" multiple class="form-control" ng-model="categorydescription" placeholder="Category Description" id="categorydescription"></div></div><div class="col-sm-4"></div></div><div class="row"><div class="col-sm-4"></div><div class="col-sm-4"><span class="form-control btn btn-info" ng-click="insertCategory()">Add Category</span></div><div class="col-sm-4"></div></div> - Replace the following code in the expense.html
123456789101112131415161718192021222324252627282930313233343536373839404142434445464748495051525354555657585960616263646566676869707172<div class="row"><div class="col-sm-4"></div><div class="col-sm-4"><hr /></div><div class="col-sm-4"></div></div><div class="row"><div class="col-sm-4 col-sm-offset-4"><span class="page-header text-center"><h1> Add Expense</h1></span></div></div><div class="row"><div class="col-sm-4"></div><div class="col-sm-4"><hr /></div><div class="col-sm-4"></div></div><div class="row"><div class="col-sm-4"></div><div class="col-sm-4"><div class="form-group"><label for="expensedon">Category Expensed on </label><select class="form-control" ng-model="expensedon" id="expensedon"><li>--</li><li>--</li></select></div></div><div class="col-sm-4"></div></div><div class="row"><div class="col-sm-4"></div><div class="col-sm-4"><div class="form-group"><label for="amount">Amount Spent</label><input type="number" class="form-control" ng-model="amount" id="amount" placeholder="Amount Spent" /></div></div><div class="col-sm-4"></div></div><div class="row"><div class="col-sm-4"></div><div class="col-sm-4"><div class="form-group"><label for="categorydescription">Notes</label><input type="text" multiple class="form-control" ng-model="categorydescription" placeholder="Notes" id="categorydescription"></div></div><div class="col-sm-4"></div></div><div class="row"><div class="col-sm-4"></div><div class="col-sm-4"><div class="form-group"><label for="categorydescription">Date</label><input type="date" multiple class="form-control" ng-model="categorydescription" placeholder="Notes" id="categorydescription"></div></div><div class="col-sm-4"></div></div><div class="row"><div class="col-sm-4"></div><div class="col-sm-4"><span class="form-control btn btn-info">Add Category</span></div><div class="col-sm-4"></div></div> - Replace the following code in the report.html
1234567891011121314151617181920212223242526272829303132333435363738394041424344454647484950515253545556575859<div ng-controller="reportCtrl"><div class="row"><div class="col-sm-4"></div><div class="col-sm-4"><canvas id="bar" class="chart chart-bar"chart-data="data" chart-labels="labels">chart-series="series"</canvas></div><div class="col-sm-4"></div></div></div><div class="row"><div class="col-sm-4"></div><div class="col-sm-4"><hr /></div><div class="col-sm-4"></div></div><div class="row"><div class="col-sm-4 col-sm-offset-4"><span class="page-header text-center"><h1> Add Categories</h1></span></div></div><div class="row"><div class="col-sm-4"></div><div class="col-sm-4"><hr /></div><div class="col-sm-4"></div></div><div class="row"><div class="col-sm-4"></div><div class="col-sm-4"><div class="form-group"><label for="categoryname">Category Name</label><input type="text" class="form-control" ng-model="categoryname" placeholder="Category Name" id="categoryname"></div></div><div class="col-sm-4"></div></div><div class="row"><div class="col-sm-4"></div><div class="col-sm-4"><div class="form-group"><label for="categorydescription">Category Description</label><input type="text" multiple class="form-control" ng-model="categorydescription" placeholder="Category Description" id="categorydescription"></div></div><div class="col-sm-4"></div></div><div class="row"><div class="col-sm-4"></div><div class="col-sm-4"><span class="form-control btn btn-info" ng-click="insertCategory()">Add Category</span></div><div class="col-sm-4"></div></div>
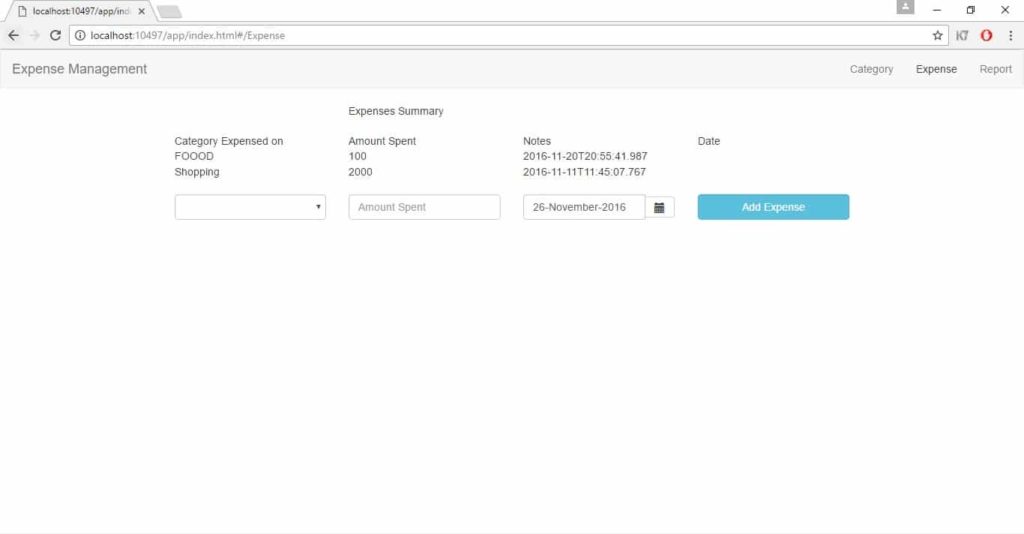
Now the front end is ready which will look like:


Following are the section details of this online course:
- Section 1: Introduction
- Section 2: Basic Angular Website
- Section 3: Web Template Store
- Section 4: myContacts App
- Section 5: ngSocial Facebook App
- Section 6: Job Directory
- Section 7: KnowledgeBase
- Section 8: User Authentication App
- Section 9: Instagram Gallery
- Section 10: PubNub Chat
- Section 11: AutoFind
- Section 12: Summary

Back End ASP.NET Web API 2.0 using Entity Framework 6.0:
Installation of Entity Framework
- Right click project in the solution explorer and select manage nugget packages for the project.
- NuGet package manager Dialog box appears as below.
- Search for Entity Framework.

- Click on install
- Click I Accept License in License Agreement Pop up.
Generation of Model Classes using Entity Framework Database First Approach:
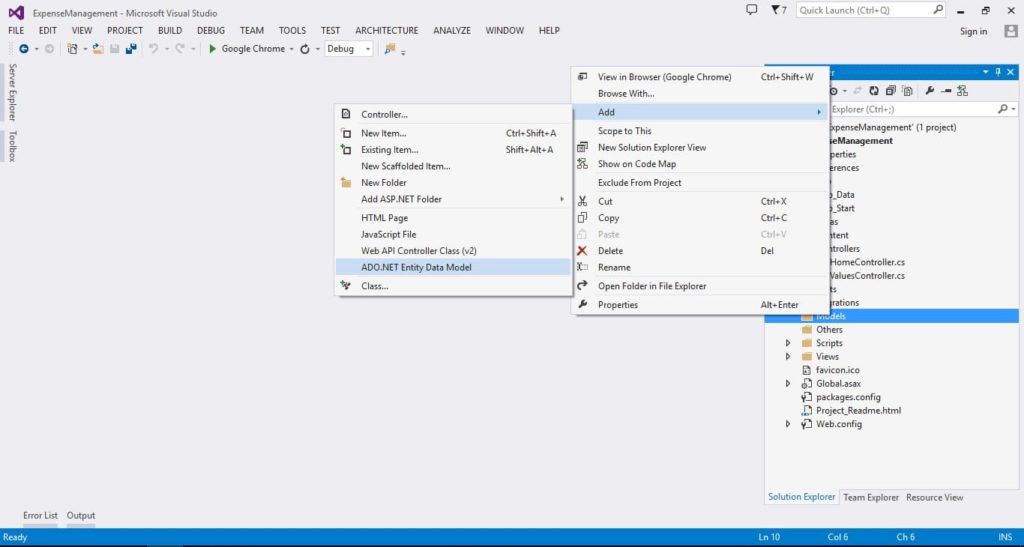
- Right click on the Model folder and project Add New Item.
- In the Add New Item Dialog box click on ADO.NET Entity Model(admx).
- Enter the name as ExpenseManagementDataModel.
- In the Select Tables/Views Dialog box by default select All radio button is selected.

Click Next and Click Finish. - The admx Data Model is generated as below.

- The solution explorer will contain the models and their configuration and context classes as below:

Creation of Web API Controllers Using the Scaffolding Technique:
- Right click controller folder and select Add -> New Scaffolded item.

- Select the controller type as:

- In the Add Controller window, select give Controller name, select the Model name which was created in the previous step using the drop down.
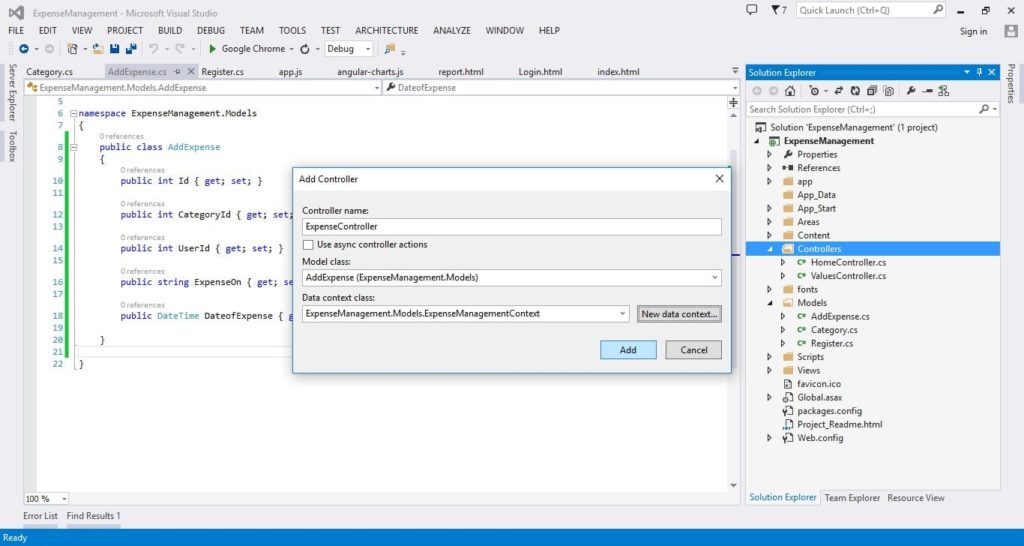
- By using the above step, select the Context class using the dropdown.
Implementing the Functionality using AngularJs:
Add the following code into the respective js pages which was created in step 3
App.js
|
1 2 3 4 5 6 7 8 9 10 11 12 13 14 15 16 17 18 19 20 21 22 23 24 25 26 27 28 29 30 31 32 33 34 35 36 37 38 39 40 41 42 |
(function () { 'use-strict' var expenseManager = angular.module('appExpenseManager'); expenseManager.config(function ($routeProvider, $locationProvider) { $routeProvider .when("/home", { templateUrl: "../app/Login.html", controller: 'loginCtrl', }) .when("/addCategory", { templateUrl: "../app/addCategory.html", controller: 'categoryCtrl', }) .when("/Expense", { templateUrl: "../app/Expense.html", controller: 'ExpensesCtrl', }) .when("/report", { templateUrl: "../app/report.html", controller: "reportCtrl" }) .when("/register", { templateUrl: "../app/register.html", controller: "registerCtrl" }) .when("/error", { templateUrl: "../app/ErrorPage.html" }); $routeProvider.otherwise({ redirectTo: '/home' }); }); expenseManager.factory('appResources', function ($resource) { var baseURL = "http://localhost:33581" var registerResource = $resource(baseURL+'/api/Register/:id'); var categoryResource = $resource(baseURL + '/api/Category/:id'); var expenseResource = $resource(baseURL + '/api/Expense/:id'); return { registerResource: registerResource, categoryResource: categoryResource, expenseResource: expenseResource } }); })(); |
categoryCtrl.js
|
1 2 3 4 5 6 7 8 9 10 11 12 13 14 15 16 17 18 19 20 21 22 23 24 25 |
(function () { angular.module('appExpenseManager').controller("categoryCtrl", function ($scope, appResources, $rootScope) { $scope.categoryname = ""; $scope.categorydescription = ""; $scope.Categories = appResources.categoryResource.query(function (response) { }) //Category Editing $scope.insertCategory = function () { var category = { "Name": $scope.categoryname, "Description": $scope.categorydescription } appResources.categoryResource.save(category, function () { alert("Category Created"); }); } appResources.categoryResource.query(function (data) { $scope.Categories = data; console.log(data); }); }); })(); |
ExpensesCtrl.js
|
1 2 3 4 5 6 7 8 9 10 11 12 13 14 15 16 17 18 19 20 21 22 23 24 25 26 27 28 29 30 31 32 33 34 35 36 37 38 39 40 41 42 43 44 45 46 47 48 49 50 51 52 53 54 55 56 57 58 59 60 61 62 63 64 65 66 67 68 69 70 71 72 73 74 75 76 77 78 79 80 81 82 83 84 85 86 87 88 89 90 91 92 93 94 95 96 97 98 99 100 101 102 103 104 105 106 107 108 109 110 111 112 113 114 115 116 117 118 119 120 121 122 |
(function () { angular.module('appExpenseManager') .controller("ExpensesCtrl", function ($scope, appResources, $rootScope) { $scope.categoryselected = ""; $scope.selectedcategory = { }; appResources.expenseResource.query(function (data) { $scope.Expenses = data; console.log(data); }); $scope.selectedcategory.Name = ""; $scope.insertExpense = function () { var ExpenseObj = { "AmountSpent": $scope.amountspent, "DateofExpense": $scope.datevalue, "UserID": $rootScope.id, "CategoryID": $scope.selectedcategory.Id }; appResources.expenseResource.save(ExpenseObj, function () { alert("Expense Added"); }); } $scope.clicked = function () { console.log($scope.selectedcategory); // console.log($scope.c); } $scope.today = function () { $scope.datevalue = new Date(); }; $scope.today(); $scope.clear = function() { $scope.datevalue = null; }; $scope.inlineOptions = { customClass: getDayClass, minDate: new Date(), showWeeks: true }; $scope.dateOptions = { formatYear: 'yy', maxDate: new Date(2020, 5, 22), minDate: new Date(), startingDay: 1 }; $scope.toggleMin = function() { $scope.inlineOptions.minDate = $scope.inlineOptions.minDate ? null : new Date(); $scope.dateOptions.minDate = $scope.inlineOptions.minDate; }; $scope.toggleMin(); $scope.open1 = function() { $scope.popup1.opened = true; }; $scope.open2 = function() { $scope.popup2.opened = true; }; $scope.setDate = function(year, month, day) { $scope.datevalue = new Date(year, month, day); }; $scope.formats = ['dd-MMMM-yyyy', 'yyyy/MM/dd', 'dd.MM.yyyy', 'shortDate']; $scope.format = $scope.formats[0]; $scope.altInputFormats = ['M!/d!/yyyy']; $scope.popup1 = { opened: false }; $scope.popup2 = { opened: false }; var tomorrow = new Date(); tomorrow.setDate(tomorrow.getDate() + 1); var afterTomorrow = new Date(); afterTomorrow.setDate(tomorrow.getDate() + 1); $scope.events = [ { date: tomorrow, status: 'full' }, { date: afterTomorrow, status: 'partially' } ]; function getDayClass(data) { var date = data.date, mode = data.mode; if (mode === 'day') { var dayToCheck = new Date(date).setHours(0, 0, 0, 0); for (var i = 0; i < $scope.events.length; i++) { var currentDay = new Date($scope.events[i].date).setHours(0, 0, 0, 0); if (dayToCheck === currentDay) { return $scope.events[i].status; } } } } appResources.categoryResource.query(function (data) { $scope.Categories = data; console.log(data); }); }); })(); |
loginCtrl.js
|
1 2 3 4 5 6 7 8 9 10 11 12 13 14 15 16 17 18 19 20 21 |
(function () { angular.module('appExpenseManager').controller("loginCtrl", function ($scope, $location,$rootScope, appResources) { $scope.username = ""; $scope.password = ""; var Registers = appResources.registerResource.query(function (response) { }); console.log(Registers); $scope.login = function () { for (var i = 0; i < Registers.length; i++) { if (Registers[i].Email == $scope.username && Registers[i].Password == $scope.password) { $rootScope.id = Registers[i].Id; $location.path('/report'); break; } else { $location.path('/error'); } } } }); })(); |
registerCtrl.js
|
1 2 3 4 5 6 7 8 9 10 11 12 13 14 15 16 17 18 19 20 21 22 23 24 25 26 27 28 29 30 31 |
(function () { 'use-strict' angular.module('appExpenseManager').controller("registerCtrl", function ($scope, $http, appResources) { $scope.username = ""; $scope.registerUser = ""; $scope.registerMe = function () { var data = { "Email": $scope.username, "Password": $scope.password }; appResources.registerResource.save(data, function () { console.log("success"); alert("Register Success"); }); } $scope.id = 1; var Register = appResources.registerResource.get({ id: $scope.id }, function () { console.log(Register); }) appResources.registerResource.query(function (data) { $scope.Registers = data; console.log(data); }) //saves an User. }); })(); |
reportCtrl.js
|
1 2 3 4 5 6 7 8 9 10 11 12 13 14 15 16 17 18 19 20 21 22 23 24 25 26 27 28 29 30 31 32 33 34 35 36 37 38 39 40 41 42 43 44 45 46 47 48 |
(function () { angular.module('appExpenseManager').controller("reportCtrl", function ($scope, $location, $http, appResources, $log) { var categoryList = []; var amountSpent = []; $http({ method: 'GET', url: 'http://localhost:33581/api/Category/' }) .success(function (data, status, headers, config) { $scope.Categories = data; console.log(data); for (var i = 0; i < $scope.Categories.length; i++) { categoryList.push($scope.Categories[i].Name); var sum=0; for (var j = 0; j < $scope.Categories[i].Expenses.length; j++) { sum += $scope.Categories[i].Expenses[j].AmountSpent; // console.log("amount",$scope.Categories[i].Expenses[j].AmountSpent); } amountSpent.push(sum); } }) .error(function (data, status, headers, config) { $log.warn(data, status, headers, config); }) console.log("CAtegory list",categoryList); $scope.labels = categoryList; $scope.series = categoryList; $scope.data = amountSpent; $scope.options = { yAxes: [{ ticks: { max: 5000, min: 0, stepSize: 250, }, barThickness: 1 }], xAxes: [{ barThickness: 1 }] } }); })(); |
This ASP.NET Web API Tutorial covered many important areas related to AngularJS 1.x and Web API in a practical manner. User will also be able to download ASP.NET Web API Tutorial PDF later. Hopefully, as an ASP.NET Web Developer, one can take the code and improve the functionality as per his/her requirements and improve his/her skill as well.
Complete Source Code for the ASP.NET Web API Expense Management Application with AngularJS is now available to download here. You just need to be a REGISTERED Member to download Source Code. Registration is FREE 🙂
Course Contents are:
- Build RESTful web services with Web API 2
- Create custom URIs with Attribute Routing
- Save data persistently in a database with Entity Framework Code First migrations
- Use Attribute Routing to your advantage
- Services and Dependency Injection
- Use JQuery to create, read, update and delete objects with Web API 2

Advanced Web Developer Interview Questions Series:
- Top 10 ASP.NET Web API Interview Questions
- Top 10 HTML5 Interview Questions
- Top 15 Bootstrap Interview Questions - MUST Have
- Top 10 ASP.NET AJAX Interview Questions
- Top 10 WCF Interview Questions
- Comprehensive Series of WCF Interview Questions
- Top 10 ASP.NET Interview Questions
- Comprehensive Series of ASP.NET Interview Questions
- Top 10 ASP.NET MVC Interview Questions
- Advanced AngularJs Interview Questions