


In this ASP.NET MVC Tutorial Series, we will follow a step by step approach to develop an Online Shopping Cart using ASP.NET MVC, C#, Entity Framework and SQL Server with database first approach. After reading this Web Development Tutorial, user must be able to understand that how to build an ASP.NET MVC Shopping Cart using above mentioned technologies very easily? The article explains the necessary details, screenshots of each step and finally the source code at the end of the series. Also, you can follow here to Build a Real-World Application using ASP.NET Core and Angular 2.
Complete Source Code for the ASP.NET MVC Shopping Cart application is now available to download here. You just need to be a REGISTERED Member to download Source Code. Registration is FREE 🙂
- A. System.Web.http
- B. System.Web.mvcframework
- C. System.Web.mvc
- D. System.Web.mvc.helpers
To further test your ASP.NET MVC skill, Take a Complete FREE Online Test or MCSD Practice Exam: 70-486 (Developing ASP.NET MVC Web Applications). Simply Click Here.
Further If you are interested to enhance your skills in all related technologies used in this article Series and others, you MUST understand related concepts in these FAQs/Interview Questions Series.
- ASP.NET MVC Interview Questions/Frequently Asked Questions (FAQs)
- Entity Framework Interview Questions/Frequently Asked Questions (FAQs)
- What’s new in Entity Framework from beginning to EF7 - EF Core
- Bootstrap Interview Questions/Frequently Asked Questions (FAQs)
- AngularJS Interview Questions/Frequently Asked Questions (FAQs)
- jQuery Interview Questions/Frequently Asked Questions (FAQs)
Correct Answer: C
ASP.NET MVC Shopping Cart - Detailed Features List
This ASP.NET MVC Tutorial is divided into three parts as mentioned below with each part implementing the necessary features in order.
- Features covered in ASP.NET MVC Online Shopping Store - Part 1
- Overall ASP.NET MVC Project Setup
- Online Shopping Store Database Setup
- Administration - All CRUD Operations for Categories
- Administration - All CRUD Operations for Products
- Administration - Mark a Product as Featured Product
- Features covered in ASP.NET MVC Online Shopping Store - Part 2
- User Registration & Authentication
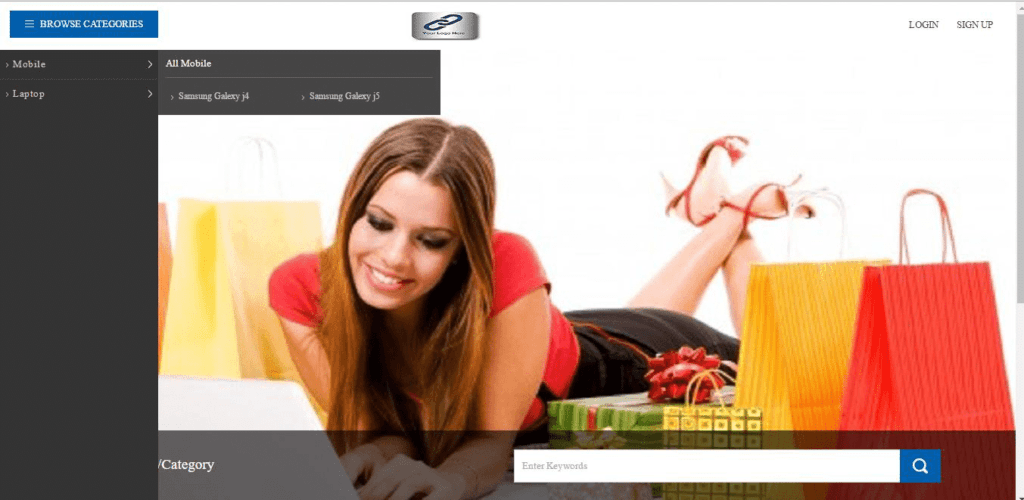
- Product Display Center
- Search Products
- Display Products by Category e.g Mobiles/Tables | Home Appliances | Other Electronics etc.
- Products List View
- Single Product Detailed View
- Shopping Cart - Add Products to Cart
- Cart View - List of Products added to Shopping Cart
- Remove Products from Shopping Cart
- Features covered in ASP.NET MVC Online Shopping Store - Part 3
- Checkout Option
- Shipping Details
- Payment Options Dummy Page
- Place Order
- Order Summary Page on successful payment
- Administration - View/List Orders
- Administration - Single Order Detailed View
Integrating MVC Shopping Cart Application with Paypal
Create the ASP.NET Web Application
- Open Visual Studio and click on ‘New Project’.
- With the left menu, select ‘Web’ tab.
- Select the option ‘ASP.NET web application’.
- Name the application. By default, allocation for project is selected, if you want to choose any other, change the location through browsing the new location.

Select application type : - Empty or Internet Application
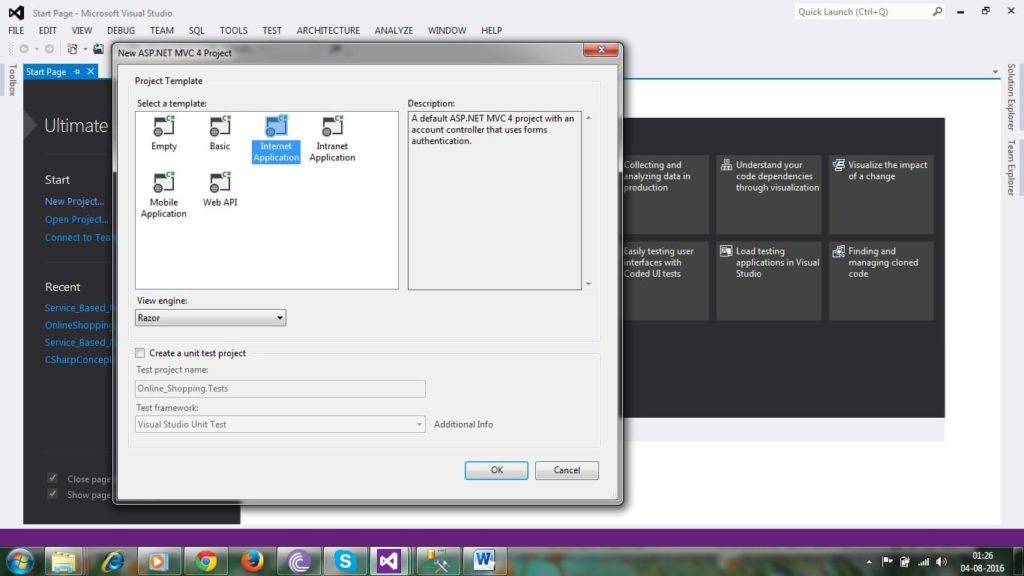
If you choose “Empty”, no controllers and actions are created. If you choose “Internet”, default MVC application is created along with Account and Home Controller. Account controller contains the actions containing membership operations.
ASP.NET MVC Controllers
It is the primary entity of ASP.NET MVC application. Controller receives the request through the browser via the route tables defined in the application. It has actions that do all the tasks for the application. it retrieve model data, and then specify view templates that return a response to the browser.
If you want to enhance your understanding about ASP.NET MVC Controllers and Action Methods, please follow here to know all about Controllers and Action Methods.
Step 2- Add Admin Controller
Now, you need to add the controller, the primary entity of MVC Application.
Right click on “Controllers” folder and click, “Add”, then “Controller”. We are focusing on admin section first, so we will name the controller “AdminController”.
After you click add, you will find that a new file named “AdminController” is created with following code in it: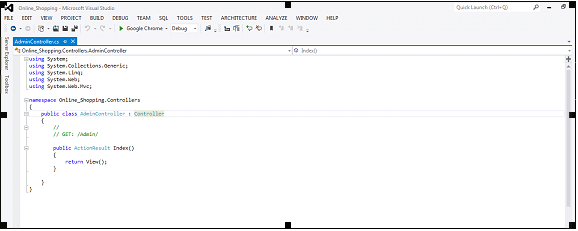
Admin section must be accessed after authentication and authorization. So, we will first integrate login for admin. If you want to open the login form, when you type http://websiteRootUrl/Admin, you should put the form on index view of admin controller.
ASP.NET MVC View
View is the representation part of MVC design pattern. It contains HTML tags along with the data to be rendered.
Razor view engine parses all data on the page and generates a pure HTML page to show on the front-end.
Add View for Admin Authentication
Right click on index method of AdminController and click “Add View“. By default, name of the action will appear as the view name.
You can select any master page form the right input below “Use a layout or master page” label.
Once you selected the master page, the empty box of layout will be filled with the selected layout.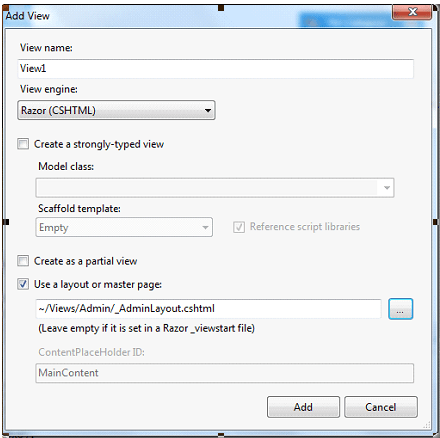
Now, click “Add” to create the view along with layout. Below is the code for our view i.e. index.cshtml file.
|
1 2 3 4 5 6 |
@{ ViewBag.Title = "Index'; Layout = "~/Views/Admin/_AdminLayout.cshtml"; } <h2>Index</h2> |
If you don’t select any layout, the following view will be rendered.
|
1 2 3 4 5 6 |
@{ ViewBag.Title = "Index'; Layout = null; } <h2>Index</h2> |
 ASP.NET MVC Model
Model contains the business objects of the application. It is a class that contains the properties, add validation rules, links to database entity.
Here we add AccountViewModel to bind the data on Admin login view.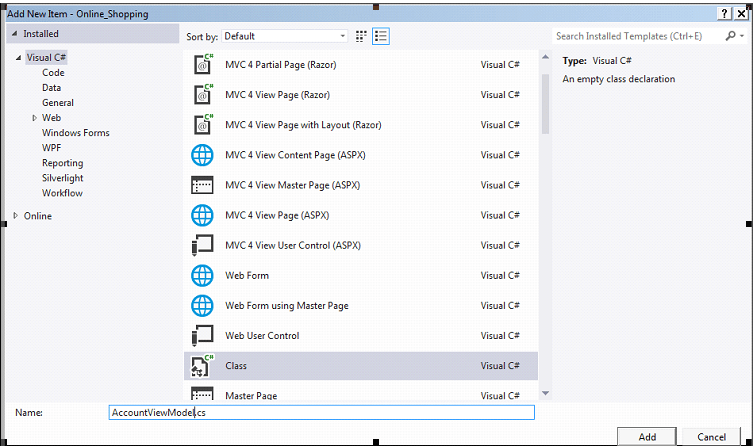
It will generate a class named “AccountViewModel” and following code in it.
|
1 2 3 4 5 6 7 8 9 10 11 12 |
using System; using System.Collections.Generic; using System.Linq; using System.Web; namespace Online_Shopping.Models { public class AccountViewModel { } } |
Now, we need to write the business objects in it. The final code will look like:
|
1 2 3 4 5 6 7 8 9 10 11 12 13 14 15 16 17 18 19 20 21 22 23 24 25 26 27 28 29 30 31 32 33 34 35 36 37 38 39 40 41 42 43 44 45 46 47 48 49 50 51 52 53 54 55 56 57 58 59 60 61 62 63 64 65 66 67 68 69 70 71 72 73 74 75 76 77 78 79 80 |
using System.ComponentModel.DataAnnotations; namespace OnlineShopping.Models { public class LoginViewModel { [Required(ErrorMessage = "Email address is required")] [DataType(DataType.EmailAddress)] [EmailAddress(ErrorMessage = "Invalid email address")] [StringLength(100, ErrorMessage = "Minimum {2} and Maximum {1} characters are allowed", MinimumLength = 5)] public string UserEmailId { get; set; } [Required(ErrorMessage = "Password is required")] [StringLength(100, ErrorMessage = "Minimum {2} and Maximum {1} characters are allowed", MinimumLength = 5)] public string Password { get; set; } public bool RememberMe { get; set; } public int UserType { get; set; } } public class RegisterViewModel { [Required(ErrorMessage = "Email address is required")] [DataType(DataType.EmailAddress)] [EmailAddress(ErrorMessage = "Invalid email address")] [StringLength(100, ErrorMessage = "Minimum {2} and Maximum {1} characters are allowed", MinimumLength = 5)] [System.Web.Mvc.Remote("CheckEmailExist", "Account", ErrorMessage= "Email address is already used")] public string UserEmailId { get; set; } [Required(ErrorMessage = "Password is required")] [StringLength(100, ErrorMessage = "Minimum {2} and Maximum {1} characters are allowed", MinimumLength = 5)] public string Password { get; set; } [Compare("NewPassword", ErrorMessage = "Password doesn't match")] public string ConfirmPassword { get; set; } [Required] [Display(Name = "User type")] public int UserType { get; set; } public bool TermsAndConditions { get; set; } } public class ChangePasswordViewModel { [Required(ErrorMessage = "Password is required")] [DataType(DataType.Password)] [StringLength(100, ErrorMessage = "Minimum {2} and Maximum {1} characters are allowed", MinimumLength = 5)] public string OldPassword { get; set; } [Required(ErrorMessage = "Password is required")] [StringLength(100, ErrorMessage = "Minimum {2} and Maximum {1} characters are allowed", MinimumLength = 5)] public string NewPassword { get; set; } [Compare("NewPassword", ErrorMessage = "Password doesn't match")] public string ConfirmPassword { get; set; } } public class ForgotPasswordViewModel { [Required(ErrorMessage = "Email address is required")] [DataType(DataType.EmailAddress)] [EmailAddress(ErrorMessage = "Invalid email address")] [StringLength(100, ErrorMessage = "Minimum {2} and Maximum {1} characters are allowed", MinimumLength = 5)] public string EmailId { get; set; } } public class ResetPasswordViewModel { public string EmailId { get; set; } [Required(ErrorMessage="Password is required")] [StringLength(100, ErrorMessage = "Minimum {2} and Maximum {1} characters are allowed", MinimumLength = 5)] public string NewPassword { get; set; } [Compare("NewPassword", ErrorMessage="Password doesn't match")] public string ConfirmPassword { get; set; } } } |
Now we write the logic to bind this model along with data in the AdminController. Here is the code for it:
|
1 2 3 4 5 6 7 8 9 10 11 12 13 14 15 16 17 18 19 20 21 22 23 24 25 26 27 28 29 30 31 32 33 34 35 36 37 38 39 40 41 42 43 44 45 46 47 |
#region Admin Login ... [AllowAnonymous] public ActionResult Index(string returnUrl) { LoginViewModel loginModel = new LoginViewModel(); loginModel.UserEmailId = Request.Cookies["RememberMe_UserEmailId"] != null ? Request.Cookies["RememberMe_UserEmailId"].Value : ""; loginModel.Password = Request.Cookies["RememberMe_Password"] != null ? Request.Cookies["RememberMe_Password"].Value : ""; ViewBag.ReturnUrl = returnUrl; return View(loginModel); } [AllowAnonymous] [HttpPost] [ValidateAntiForgeryToken] [ValidateInput(false)] public ActionResult Index(LoginViewModel model, string returnUrl) { if (ModelState.IsValid) { string EncryptedPassword = EncryptDecrypt.Encrypt(model.Password, true); var user = _unitOfWork.GetRepositoryInstance<Tbl_Members>().GetFirstOrDefaultByParameter(i => i.EmailId == model.UserEmailId && i.Password == EncryptedPassword && i.IsActive == true && i.IsDelete == false); if (user != null) { Session["MemberId"] = user.MemberId; var roles = _unitOfWork.GetRepositoryInstance<Tbl_MemberRole>().GetFirstOrDefaultByParameter(i => i.MemberId == user.MemberId && i.RoleId == model.UserType); if (roles != null) { Response.Cookies["MemberRole"].Value = _unitOfWork.GetRepositoryInstance<Tbl_Roles>().GetFirstOrDefaultByParameter(i => i.RoleId == model.UserType).RoleName; } else { ModelState.AddModelError("Password", "Password is wrong"); return View(model); } } else { ModelState.AddModelError("Password", "Invalid email address or password"); } } return View(model); } #endregion |
Adding code for admin login in View:
|
1 2 3 4 5 6 7 8 9 10 11 12 13 14 15 16 17 18 19 20 21 22 23 24 25 26 27 28 29 30 31 32 33 34 35 36 37 38 39 40 41 42 43 44 45 46 47 48 49 50 51 52 53 54 55 56 57 58 59 60 61 62 63 64 65 66 67 68 69 70 71 72 73 74 |
@model OnlineShopping.Models.LoginViewModel @{ ViewBag.Title = "Index"; Layout = null; } <html> <head> <title>Online Shopping</title> <link href="/CSS/admin_stylesheet.css" rel="stylesheet" type="text/css" /> </head> <body> <style> .AdminLogin { margin: 7% 30%; padding: 6% 10%; background: rgb(236, 233, 233); } .dashinp { margin-bottom: 10px; } .SignIn { text-align: center; padding: 5PX 30PX; background-color: rgb(30, 95, 209); color: #FFF; margin: 10% 0 10% 30%; } .forgot { margin-top: 8%; font-size: 14px; } </style> <div class="AdminLogin"> @using (Html.BeginForm("Index", "Admin", new { ReturnUrl = ViewBag.ReturnUrl }, FormMethod.Post, new { @class = "form-horizontal", role = "form" })) { @Html.AntiForgeryToken() <h1 style="text-align: center; margin-bottom: 20px">Admin Login</h1> <div class="loginDetail"> @Html.TextBoxFor(m => m.UserEmailId, new { @class = "dashinp", @placeholder = "Username" }) @Html.ValidationMessageFor(m => m.UserEmailId) @Html.PasswordFor(m => m.Password, new { @type = "password", @class = "dashinp", @placeholder = "Password" }) @Html.ValidationMessageFor(m => m.Password) <label style="display: none;">@Html.RadioButton("UserType", 1, new { @checked = "checked", }) Admin</label> <div class="forgot clearfix" style="display: none;"> @Html.CheckBoxFor(m => m.RememberMe, new { @class = "csscheck" }) <label for="RememberMe" class="csslabel fl">Keep Me Signed In</label> <a class="fgt fr" href="/Account/ForgotPassword">Forgot Password?</a> </div> <div class="forgot clearfix"> <input type="checkbox" name="RememberMe1" class="csscheck" id="c1" checked> <label for="c1" class="csslabel">Remember me</label> <a href="/Account/ForgotPassword" class="fgt fr">Forgot Password?</a> </div> <input type="submit" value="Sign In" class="SignIn"> </div> } </div> <script type="text/javascript" src="/Scripts/jquery.min.js"></script> <script src="~/Scripts/jquery.validate.min.js"></script> <script src="~/Scripts/jquery.validate.unobtrusive.min.js"></script> <script src="~/Scripts/jquery.unobtrusive-ajax.js"></script> </body> </html> |

Create database that will contain the data
In order to Create a database, open Microsoft SQL Server and put valid credentials for authentication. Create database after right clicking on “Databases” node. Enter database name “Online_Shopping” and click “OK” button, a new database will be created for you.
We assume that you are familiar with creating a new database using SQL Server Wizard (that is quite simple) but you can also create database by using below SQL Query:
|
1 |
Create Database Online_Shopping |
Now, add following three tables to our newly created database:
- Tbl_Members
- Tbl_Category
- Tbl_Product
It’s very simple to add new table to database along with column names and their datatypes and set the keys where-ever necessary as primary key or foreign key etc. So we are skipping this step.
We have following tables:
Tbl_Members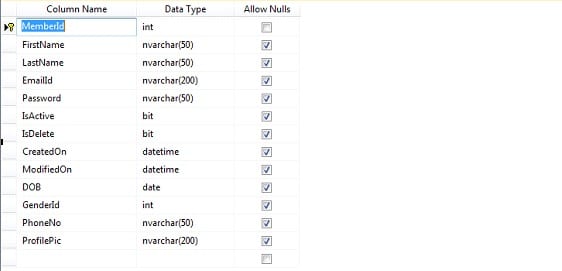
Tbl_Category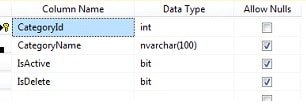
Tbl_Product
I have added Tbl_[Table Name] to identify the class generated from database.
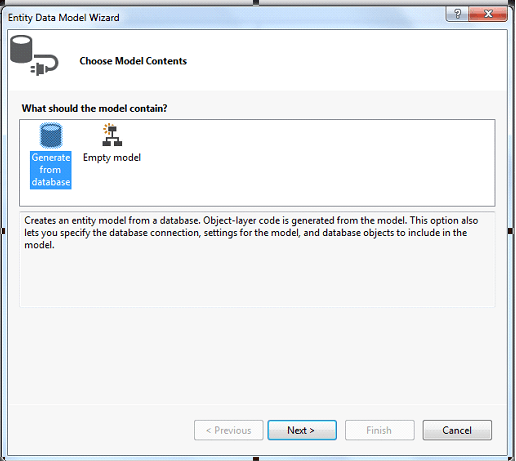
Now, add a new folder “DAL” in our solution. Add “Entity Data Model and XML (EDMX)” file to our project. It will link the database objects. If “ADO.Net Entity Data Model” doesn’t appear here, add it as:
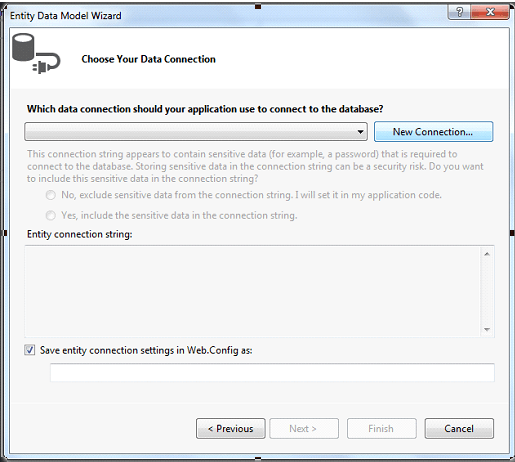
Click new connection and Fill the database details and click “OK”.
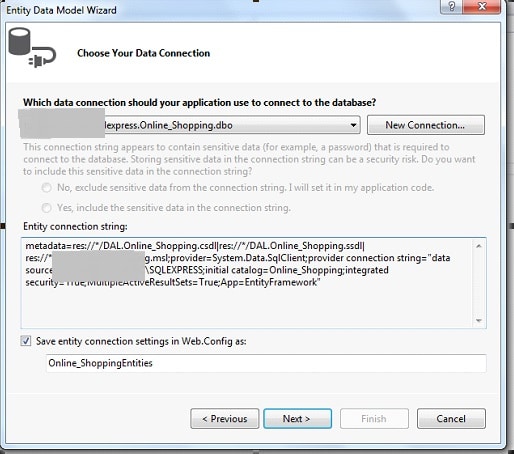
It will create the entity along with the connection string to be put on Web.Config file.
Click the tables. It contains all the tables in the database. Now click “Finish”.
Our EDMX file will be created as follows in design view:
Now, if you look in the DAL folder, you will find multiple files has been created.
Online_ShoppingEntities.Context.cs is the database context class and contains all the definition related to all the data base objects in the form of POCO classes.
Online_ShoppingEntities.Context.cs will contain:
|
1 2 3 4 5 6 7 8 9 10 11 12 13 14 15 16 17 18 19 20 21 22 23 |
namespace Online_Shopping.DAL { using System; using System.Data.Entity; using System.Data.Entity.Infrastructure; public partial class Online_ShoppingEntities : DbContext { public Online_ShoppingEntities() : base("name=Online_ShoppingEntities") { } protected override void OnModelCreating(DbModelBuilder modelBuilder) { throw new UnintentionalCodeFirstException(); } public DbSet<Tbl_Category> Tbl_Category { get; set; } public DbSet<Tbl_Members> Tbl_Members { get; set; } public DbSet<Tbl_Product> Tbl_Product { get; set; } } } |
- Learn ASP NET MVC 5 step by step [Maruti Makwana, Corporate Trainer] 28 Lectures, 2.5 Hours Video, Intermediate Level Very easy to learn video series on Asp.Net MVC 5 Specially for those who are familiar with Asp.Net Web forms.
- AngularJS for ASP.NET MVC Developers [Brett Romero] 10 Lectures, 1 hour video, Intermediate Level The Fastest Way For .NET Developers To Add AngularJS To Their Resume
- ASP.NET with Entity Framework from Scratch [Manzoor Ahmad, MCPD | MCT] 77 Lectures, 10 hour video, All Level Latest approach of web application development
- Comprehensive ASP.NET MVC [3D BUZZ] 34 lectures, 14 Hours Video, All Levels From zero knowledge of ASP.NET to deploying a complete project to production.
The Admin Login page will be displayed as

After putting valid credentials, the admin can enter in his dashboard. The dashboard view is:
There will be menus on the page to manage the content on the application.
Now add an action to list the categories.
The code for it is:
|
1 2 3 4 5 6 7 8 |
#region Manage Categories ... #region List Category public ActionResult Categories() { List<OnlineShopping.DAL.Tbl_Category> AllCategories = _unitOfWork.GetRepositoryInstance<OnlineShopping.DAL.Tbl_Category>().GetAllRecordsIQueryable().Where(i => i.IsDelete == false).ToList(); return View(AllCategories); } #endregion |
Add view to display the list. View will contain:
After writing the codes, when you click on categories link, you will get following screen:
|
1 2 3 4 5 6 7 8 9 10 11 12 13 14 15 16 17 18 19 20 21 22 23 24 25 26 27 28 29 30 31 32 33 34 35 36 37 38 39 40 41 42 43 44 45 46 47 48 49 50 51 52 53 54 55 56 57 58 59 60 61 62 63 64 65 66 67 68 69 70 71 72 73 |
@model List<OnlineShopping.DAL.Tbl_Category> @{ ViewBag.Title = "Seekers"; Layout = "~/Views/Admin/_AdminLayout.cshtml"; } <div class="rightpart"> <div class="sechBx clearfix"> <div class="bretcrum">Dashboard</div> </div> <div class="dashBx"> <div class="dashboardHD">Categories</div> <div id="AddNewPage"> <a href="/Admin/AddCategory" class="AddNewContent">Add New Category </a> </div> @if (Model.Count > 0) { <div class="dashTable" id="rootId"> <table id="tblId"> <thead> <tr> <th>Sr. No.</th> <th>Category Name</th> <th>Action</th> </tr> </thead> <tbody> @foreach (var item in Model) { <tr> <td>@(Model.IndexOf(item) + 1)</td> <td><a style="cursor: pointer; color: #4a83d4; text-decoration: underline;" title="Click to see its products" href="/admin/[email protected]">@item.CategoryName</a></td> <td> @Html.ActionLink("Edit", "UpdateCategory", "Admin", new { categoryId = item.CategoryId }, new { @class = "editBtn" }) <a href="javascript:void(0)" onclick="deletedata (@item.CategoryId)" class="delBtn">Delete</a> </td> </tr> } </tbody> </table> </div> } else { <br /> <br /> <div class="NoRecord"> <h3>No records found</h3> <div class="clearfix"></div> <div class="dashfrm-L submitBtns"> <a onclick="window.history.back();" class="editBtn cancelBtn" style="width: 48%;"><< Back</a> </div> </div> } </div> </div> @section js{ <script> $(document).ready(function () { $('#tblId').dataTable({ columnDefs: [ { orderable: false, targets: -1 } ] }); }); function deletedata(x) { SweetAlertDeleteConfirmation('warning', '', 'Are you sure, you want to delete this category?', '', 'Category deleted successfully.', '', 'Category is not deleted', '/Admin/DeleteCategory', x); } </script> } |
After writing the codes, when you click on categories link, you will get following screen: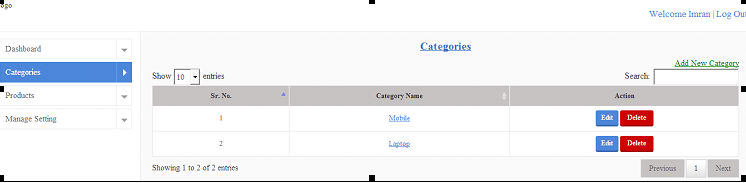
From here, you can add new category or update existing category.
Code for Add/Update operation is:
|
1 2 3 4 5 6 7 8 9 10 11 12 13 14 15 16 17 18 19 20 21 22 23 24 25 26 27 28 29 30 31 32 33 34 35 36 37 38 39 40 41 42 43 44 45 46 47 48 49 50 51 52 53 54 55 56 57 58 |
#region Add/Update Category public ActionResult AddCategory() { return UpdateCategory(0); } public ActionResult UpdateCategory(int categoryId) { CategoryDetail cd; if (categoryId != 0) cd = cd = JsonConvert.DeserializeObject<CategoryDetail>(JsonConvert.SerializeObject(_unitOfWork.GetRepositoryInstance<OnlineShopping.DAL.Tbl_Category>().GetFirstOrDefault(categoryId))); else cd = new CategoryDetail(); return View("UpdateCategory", cd); } [HttpPost] [ValidateAntiForgeryToken] public ActionResult UpdateCategory(CategoryDetail cd) { if (ModelState.IsValid) { Tbl_Category cat = _unitOfWork.GetRepositoryInstance<Tbl_Category>().GetFirstOrDefault(cd.CategoryId); cat = cat != null ? cat : new Tbl_Category(); cat.CategoryName = cd.CategoryName; if (cd.CategoryId != 0) { _unitOfWork.GetRepositoryInstance<Tbl_Category>().Update(cat); _unitOfWork.SaveChanges(); } else { cat.IsActive = true; cat.IsDelete = false; _unitOfWork.GetRepositoryInstance<Tbl_Category>().Add(cat); } return RedirectToAction("Categories"); } else return View("UpdateCategory", cd); } public int DeleteCategory(int itemId) { _unitOfWork.GetRepositoryInstance<OnlineShopping.DAL.Tbl_Category>().InactiveAndDeleteMarkByWhereClause(i => i.CategoryId == itemId, (u => { u.IsActive = false; u.IsDelete = true; })); return 1; } public JsonResult CheckCategoryExist(string CategoryName) { int CategoryId = 0; if (HttpUtility.ParseQueryString(Request.UrlReferrer.Query)["categoryId"] != null) CategoryId = Convert.ToInt32(HttpUtility.ParseQueryString(Request.UrlReferrer.Query)["categoryId"]); var CategoryExist = _unitOfWork.GetRepositoryInstance<OnlineShopping.DAL.Tbl_Category>().GetAllRecordsIQueryable().Where(i => i.CategoryName == CategoryName && i.CategoryId != CategoryId && i.IsActive == true && i.IsDelete == false).Count(); return CategoryExist == 0 ? Json(true, JsonRequestBehavior.AllowGet) : Json(false, JsonRequestBehavior.AllowGet); } #endregion |
In order to validate the properties of category, we add a model “CategoryDetail”. It will contain:
|
1 2 3 4 5 6 7 8 9 10 11 12 13 |
public class CategoryDetail { public int CategoryId { get; set; } [Required(ErrorMessage = "Category name is required")] [StringLength(100, ErrorMessage = "Minimum 3 and Minimum 5 and Maximum 100 characters are allowed", MinimumLength = 3)] [System.Web.Mvc.Remote("CheckCategoryExist", "Admin", ErrorMessage = "Category already exist")] public string CategoryName { get; set; } public Nullable<bool> IsActive { get; set; } public Nullable<bool> IsDelete { get; set; } } |
Add view to Add/Update category:
Right click on action and click “Add View”. The view for Add/Update category will contain:
|
1 2 3 4 5 6 7 8 9 10 11 12 13 14 15 16 17 18 19 20 21 22 23 24 25 26 27 28 29 30 31 32 33 34 35 |
@model OnlineShopping.Models.CategoryDetail @{ ViewBag.Title = "CategoryDetail"; Layout = "~/Views/Admin/_AdminLayout.cshtml"; } <div class="rightpart"> <div class="sechBx clearfix"> <div class="bretcrum"><a href="#">Dashboard</a> » <span>Form</span></div> </div> <div class="dashBx"> @using (Html.BeginForm("UpdateCategory", "Admin", FormMethod.Post, new {enctype="multipart/form-data" })) { @Html.AntiForgeryToken() <div class="dashboardHD"> @(Request.Url.ToString().ToLower().Contains("addcategory") ? "Add Category" : "Update Category") </div> <div class="dashformBx dashformBx2 clearfix"> @Html.HiddenFor(m => m.CategoryId) <div class="dashfrm-L"> <label class="lblTxt">Category Name*</label> @Html.TextBoxFor(m => m.CategoryName, new { @class = "dashInp", @onkeypress = "return OnlyLegalCharacters();" }) @Html.ValidationMessageFor(m => m.CategoryName) </div> <div class="clearfix"></div> <div class="dashfrm-L submitBtns"> <a onclick="window.history.back();" class="editBtn cancelBtn" style="width: 48%;">Cancel</a> <input type="submit" value="Submit" onclick="return CheckValidInput(this);" class="editBtn" style="width: 48%;" /> </div> </div> } </div> </div> |
The page will be displayed as:
After updating the name, once you submit the form, the value gets updated in database.
Listing Products:
Create an action “Products” in admin Controller and add view of it. Controller and view can be added as described previously. Create a model “ProductDetail” that will contain the product properties and validations.
Products action will be:
|
1 2 3 4 5 6 7 8 9 10 11 |
#region Product Listing... /// <summary> /// Product Listing /// </summary> /// <returns></returns> public ActionResult Products() { List<OnlineShopping.DAL.Tbl_Product> products = _unitOfWork.GetRepositoryInstance<OnlineShopping.DAL.Tbl_Product>().GetAllRecordsIQueryable().Where(i => i.IsDelete == false).ToList(); return View(products); } #endregion |
Product view will be:
|
1 2 3 4 5 6 7 8 9 10 11 12 13 14 15 16 17 18 19 20 21 22 23 24 25 26 27 28 29 30 31 32 33 34 35 36 37 38 39 40 41 42 43 44 45 46 47 48 49 50 51 52 53 54 55 56 57 58 59 60 61 62 63 64 65 66 67 68 69 70 71 72 73 74 75 76 77 78 79 80 81 82 83 84 85 86 87 88 89 90 91 92 93 94 95 96 97 98 99 100 101 |
@model List<OnlineShopping.DAL.Tbl_Product> @{ ViewBag.Title = "Products"; Layout = "~/Views/Admin/_AdminLayout.cshtml"; } <div class="rightpart"> <div class="sechBx clearfix"> <div class="bretcrum">Dashboard</div> </div> <div class="dashBx"> <div class="dashboardHD"> Products</div> <div id="AddNewPage"> <a href="/Admin/AddProduct" class="AddNewContent"> Add New Product </a> </div> <div class="dashTable" id="rootId"> @if (Model.Count > 0) { <table id="tblId"> <thead> <tr> <th>Sr. No.</th> <th>Image</th> <th>Product</th> <th>Category</th> <th>Price</th> <th>Featured</th> <th>Action</th> </tr> </thead> <tbody> @foreach (var item in Model) {<tr> <td>@(Model.IndexOf(item) + 1)</td> @{ if (File.Exists(Server.MapPath(System.Configuration.ConfigurationManager.AppSettings["ProductImage"] + "Small/" + item.ProductId + "_" + item.ProductImage))) { <img src="@(System.Configuration.ConfigurationManager.AppSettings["ProductImage"] + "Small/" + item.ProductId + "_" + item.ProductImage)" /> } else { <img src="/images/No Photo.png" alt="" />} }</a> </td> <td><a title="Click to see the product detail" href="/admin/[email protected]"> @item.ProductName</a></td> <td>@item.Tbl_Category.CategoryName</td> <td>@item.Price</td> <td>@(item.IsFeatured == true ? "Yes" : "No")</td> <td class="ListButtons"> @Html.ActionLink("Edit", "UpdateProduct", "Admin", new { productId = item.ProductId }, new { @class = "editBtn" }) <a href="javascript:void(0)" onclick="deletedata (@item.ProductId)" class="delBtn">Delete</a> </td> </tr> } </tbody> </table> } else { <table id="tblId1"> <thead> <tr> <th>Sr. No.</th> <th>Image</th> <th>Product</th> <th>Category</th> <th>Price</th> <th>Action</th> </tr> </thead> <tbody> <tr><td colspan="6">No records found</td></tr> </tbody> </table> } </div> <div class="clearfix"></div> <div class="dashfrm-L submitBtns"> <a onclick="window.history.back();" class="editBtn cancelBtn" style="width: 48%;"> << Back</a> </div> </div> </div> @section js{ <script> $(document).ready(function () { $('#tblId').dataTable({ columnDefs: [ { orderable: false, targets: -1 } ] }); }); function deletedata(x) { SweetAlertDeleteConfirmation('warning', '', 'Are you sure, you want to delete this product?', '', 'Product deleted successfully.', '', 'Product is not deleted', '/Admin/DeleteProduct', x); } </script> } |
Product list page will look like:

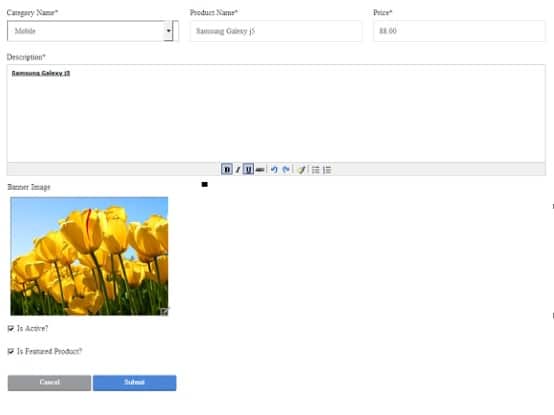
Add/Update Product
Create Actions AddProduct and UpdateProduct for Add/Update actions on product.
Code is:
|
1 2 3 4 5 6 7 8 9 10 11 12 13 14 15 16 17 18 19 20 21 22 23 24 25 26 27 28 29 30 31 32 33 34 35 36 37 38 39 40 41 42 43 44 45 46 47 48 49 50 51 52 53 54 55 56 57 58 59 60 61 62 63 64 65 66 67 68 69 70 71 72 73 74 75 76 77 78 |
#region Add/Update Product... /// <summary> /// Add Product /// </summary> /// <returns></returns> public ActionResult AddProduct() { return UpdateProduct(0); } /// <summary> /// Update Product /// </summary> /// <param name="productId"></param> /// <returns></returns> public ActionResult UpdateProduct(int productId) { ProductDetail pd = _unitOfWork.GetRepositoryInstance<Tbl_Product>().GetListByParameter(i => i.ProductId == productId).Select(j => new ProductDetail { CategoryId = j.CategoryId, Description = j.Description, IsActive = j.IsActive ?? default(bool), Price = j.Price ?? default(decimal), ProductId = j.ProductId, ProductImage = j.ProductImage, ProductName = j.ProductName, IsFeatured = j.IsFeatured ?? default(bool) }).FirstOrDefault(); pd = pd != null ? pd : new ProductDetail(); pd.Categories = new SelectList(_unitOfWork.GetRepositoryInstance<Tbl_Category>().GetAllRecordsIQueryable(), "CategoryId", "CategoryName"); return View("UpdateProduct", pd); } /// <summary> /// Updating Product details to DB /// </summary> /// <param name="pd"></param> /// <param name="_ProductImage"></param> /// <returns></returns> [HttpPost] [ValidateInput(false)] [ValidateAntiForgeryToken] public ActionResult UpdateProduct(ProductDetail pd, HttpPostedFileBase _ProductImage) { if (ModelState.IsValid) { Tbl_Product prod = _unitOfWork.GetRepositoryInstance<Tbl_Product>().GetFirstOrDefault(pd.ProductId); prod = prod != null ? prod : new Tbl_Product(); prod.CategoryId = pd.CategoryId; prod.Description = pd.Description; prod.IsActive = pd.IsActive; prod.IsFeatured = pd.IsFeatured; prod.Price = pd.Price; prod.ProductImage = _ProductImage != null ? _ProductImage.FileName : prod.ProductImage; prod.ProductName = pd.ProductName; prod.ModifiedDate = DateTime.Now; if (prod.ProductId == 0) { prod.CreatedDate = DateTime.Now; prod.IsDelete = false; _unitOfWork.GetRepositoryInstance<Tbl_Product>().Add(prod); } else { _unitOfWork.GetRepositoryInstance<Tbl_Product>().Update(prod); _unitOfWork.SaveChanges(); } if (_ProductImage != null) uc.UploadImage(_ProductImage, prod.ProductId + "_", "/Content/ProductImage/", Server, _unitOfWork, 0, prod.ProductId, 0); return RedirectToAction("Products"); } pd.Categories = new SelectList(_unitOfWork.GetRepositoryInstance<Tbl_Category>().GetAllRecordsIQueryable(), "CategoryId", "CategoryName"); return View("UpdateProduct", pd); } public JsonResult CheckProductExist(string ProductName) { int productId = 0; if (HttpUtility.ParseQueryString(Request.UrlReferrer.Query)["productId"] != null) productId = Convert.ToInt32(HttpUtility.ParseQueryString(Request.UrlReferrer.Query)["productId"]); var productExist = _unitOfWork.GetRepositoryInstance<OnlineShopping.DAL.Tbl_Product>().GetAllRecordsIQueryable().Where(i => i.ProductName == ProductName && i.ProductId != productId && i.IsActive == true && i.IsDelete == false).Count(); return productExist == 0 ? Json(true, JsonRequestBehavior.AllowGet) : Json(false, JsonRequestBehavior.AllowGet); } #endregion |
Product Detail Model: It is used for validating the user input.
|
1 2 3 4 5 6 7 8 9 10 11 12 13 14 15 16 17 18 19 20 21 22 23 24 25 26 27 28 29 30 31 32 33 34 |
public class ProductDetail { public int ProductId { get; set; } [Required] [StringLength(100, ErrorMessage = "Minimum 3 and Minimum 5 and Maximum 100 characters are allowed", MinimumLength = 3)] [System.Web.Mvc.Remote("CheckProductExist", "Admin", ErrorMessage = "Product already exist")] public string ProductName { get; set; } [Required] [Range(1, 50)] public Nullable<int> CategoryId { get; set; } public bool IsActive { get; set; } public bool IsDelete { get; set; } public Nullable<System.DateTime> CreatedDate { get; set; } public Nullable<System.DateTime> ModifiedDate { get; set; } [Required] public string Description { get; set; } public string ProductImage { get; set; } [Required] [DataType(DataType.Currency)] [Range(typeof(decimal), "1", "2000", ErrorMessage = "Invalid price")] public decimal Price { get; set; } public bool IsFeatured { get; set; } public SelectList Categories { get; set; } } |
Single product detail view:
We can get this screen on click on product image or name on product list page.
Create Action ProductDetail in controller and add its view.
ProductDetail action will contain:
|
1 2 3 4 5 6 7 |
#region Product Details... public ActionResult ProductDetail(int productId) { Tbl_Product pd = _unitOfWork.GetRepositoryInstance<Tbl_Product>().GetFirstOrDefault(productId); return View(pd); } #endregion |
View will contain:
|
1 2 3 4 5 6 7 8 9 10 11 12 13 14 15 16 17 18 19 20 21 22 23 24 25 26 27 28 29 30 31 32 33 34 35 36 37 38 39 40 41 42 43 44 45 46 47 48 49 50 51 52 |
@model OnlineShopping.DAL.Tbl_Product @{ ViewBag.Title = "ProductDetail"; Layout = "~/Views/Admin/_AdminLayout.cshtml"; } <div class="rightpart"> <div class="sechBx clearfix"> <div class="bretcrum"><a href="#">Dashboard</a> » <span>Form</span></div> </div> <div class="dashBx" style="background-color: #ffffff"> <div class="dashboardHD">Product Detail</div> <table style="background-color: #ffffff"> <tbody> <tr> <th>Product Name</th> <td>@Model.ProductName</td> </tr> <tr> <th>Category Name</th> <td>@Model.Tbl_Category.CategoryName</td> </tr> <tr> <th>Price</th> <td>@Model.Price</td> </tr> <tr> <th>Description</th> <td>@Html.Raw(Model.Description)</td> </tr> <tr> <th>Is Active</th> <td>@(Model.IsActive == true ? "Yes" : "No")</td> </tr> <tr> <th>Is Featured</th> <td>@(Model.IsFeatured == true ? "Yes" : "No")</td> </tr> </tbody> <tr> <td colspan="2">@if (Model.ProductImage != null && Model.ProductImage != "") { <img src="@(Path.Combine(System.Configuration.ConfigurationManager.AppSettings["ProductImage"], "Large/", Model.ProductId + "_" + Model.ProductImage))" alt="" id="ImgProfServiceBanner" /> } else { <img src="/images/No Photo.png" alt="" id="ImgProfServiceBanner" /> }</td> </tr> </table> </div> </div> |
The screen will look like:
I have used “Unit of Work” along with repository pattern for interaction with database.
Unit of Work is referred to as a single transaction that involves multiple operations of insert/update/delete and so on kinds. To say it in simple words, it means that for a specific action (say Update product ), all the transactions like insert/update/delete and so on are done in one single transaction, rather then doing multiple database transactions. This means, one unit of work here involves insert/update/delete operations, all in one single transaction.
The code is:
|
1 2 3 4 5 6 7 8 9 10 11 12 13 14 15 16 17 18 19 20 21 22 23 24 25 26 27 28 29 30 31 32 33 34 35 36 |
public class GenericUnitOfWork : IDisposable { private Online_ShoppingEntities DBEntity = new Online_ShoppingEntities(); public IRepository GetRepositoryInstance() where Tbl_EntityType : class { return new GenericRepository(DBEntity); } public void SaveChanges() { DBEntity.SaveChanges(); } #region Disposing the Unit of work context ... private bool disposed = false; protected virtual void Dispose(bool disposing) { if (!this.disposed) { if (disposing) { DBEntity.Dispose(); } } this.disposed = true; } public void Dispose() { Dispose(true); GC.SuppressFinalize(this); } #endregion } } |
Repository interface is:
|
1 2 3 4 5 6 7 8 9 10 11 12 13 14 15 16 17 18 19 20 21 |
public interface IRepository where Tbl_Entity : class { IEnumerable GetAllRecords(); IQueryable GetAllRecordsIQueryable(); IEnumerable GetRecordsToShow(int pageNo, int pageSize, int currentPageNo, Expression<Func<Tbl_Entity, bool>> wherePredict, Expression<Func<Tbl_Entity, int>> orderByPredict); int GetAllRecordsCount(); void Add(Tbl_Entity entity); void Update(Tbl_Entity entity); void UpdateByWhereClause(Expression<Func<Tbl_Entity, bool>> wherePredict, Action ForEachPredict); Tbl_Entity GetFirstOrDefault(int recordId); void Remove(Tbl_Entity entity); void RemoveByWhereClause(Expression<Func<Tbl_Entity, bool>> wherePredict); void RemoveRangeByWhereClause(Expression<Func<Tbl_Entity, bool>> wherePredict); void InactiveAndDeleteMarkByWhereClause(Expression<Func<Tbl_Entity, bool>> wherePredict, Action ForEachPredict); Tbl_Entity GetFirstOrDefaultByParameter(Expression<Func<Tbl_Entity, bool>> wherePredict); IEnumerable GetListByParameter(Expression<Func<Tbl_Entity, bool>> wherePredict); IEnumerable GetResultBySqlProcedure(string query, params object[] parameters); } |
And its implementation is:
|
1 2 3 4 5 6 7 8 9 10 11 12 13 14 15 16 17 18 19 20 21 22 23 24 25 26 27 28 29 30 31 32 33 34 35 36 37 38 39 40 41 42 43 44 45 46 47 48 49 50 51 52 53 54 55 56 57 58 59 60 61 62 63 64 65 66 67 68 69 70 71 72 73 74 75 76 77 78 79 80 81 82 83 84 85 86 87 88 89 90 91 92 93 94 95 96 97 98 99 100 101 102 103 104 105 106 107 108 109 110 111 112 113 114 115 116 117 118 119 120 121 122 123 124 125 126 127 128 129 130 131 132 133 134 135 136 137 138 139 140 141 142 143 144 145 |
using OnlineShopping.DAL; using System; using System.Collections.Generic; using System.Data; using System.Data.Entity; using System.Linq; using System.Linq.Expressions; using System.Web; namespace OnlineShopping.Repository { // This is used to Isolate the EntityFramework based Data Access Layer from the MVC Controller class public class GenericRepository : IRepository where Tbl_Entity : class { DbSet _dbSet; private Online_ShoppingEntities _DBEntity; public GenericRepository(Online_ShoppingEntities DBEntity) { _DBEntity = DBEntity; _dbSet = _DBEntity.Set(); } public IEnumerable GetAllRecords() { return _dbSet.ToList(); } public IQueryable GetAllRecordsIQueryable() { return _dbSet; } public IEnumerable GetRecordsToShow(int pageNo, int pageSize, int currentPageNo, Expression<Func<Tbl_Entity, bool>> wherePredict, Expression<Func<Tbl_Entity, int>> orderByPredict) { if (wherePredict != null) return _dbSet.OrderBy(orderByPredict).Where(wherePredict).ToList(); else return _dbSet.OrderBy(orderByPredict).ToList(); } public int GetAllRecordsCount() { return _dbSet.Count(); } public void Add(Tbl_Entity entity) { _dbSet.Add(entity); _DBEntity.SaveChanges(); } /// /// Updates table entity passed to it /// ///public void Update(Tbl_Entity entity) { _dbSet.Attach(entity); _DBEntity.Entry(entity).State = EntityState.Modified; } public void UpdateByWhereClause(Expression<Func<Tbl_Entity, bool>> wherePredict, Action forEachPredict) { _dbSet.Where(wherePredict).ToList().ForEach(forEachPredict); } public Tbl_Entity GetFirstOrDefault(int recordId) { return _dbSet.Find(recordId); } public Tbl_Entity GetFirstOrDefaultByParameter(Expression<Func<Tbl_Entity, bool>> wherePredict) { return _dbSet.Where(wherePredict).FirstOrDefault(); } public IEnumerable GetListByParameter(Expression<Func<Tbl_Entity, bool>> wherePredict) { return _dbSet.Where(wherePredict).ToList(); } public void Remove(Tbl_Entity entity) { if (_DBEntity.Entry(entity).State == EntityState.Detached) _dbSet.Attach(entity); _dbSet.Remove(entity); } public void RemoveByWhereClause(Expression<Func<Tbl_Entity, bool>> wherePredict) { Tbl_Entity entity = _dbSet.Where(wherePredict).FirstOrDefault(); Remove(entity); } public void RemoveRangeByWhereClause(Expression<Func<Tbl_Entity, bool>> wherePredict) { List entity = _dbSet.Where(wherePredict).ToList(); foreach (var ent in entity) { Remove(ent); } } public void DeleteMarkByWhereClause(Expression<Func<Tbl_Entity, bool>> wherePredict, Action ForEachPredict) { _dbSet.Where(wherePredict).ToList().ForEach(ForEachPredict); _DBEntity.SaveChanges(); } public void InactiveAndDeleteMarkByWhereClause(Expression<Func<Tbl_Entity, bool>> wherePredict, Action ForEachPredict) { _dbSet.Where(wherePredict).ToList().ForEach(ForEachPredict); _DBEntity.SaveChanges(); } /// /// Returns result by where clause in descending order /// ////// public IQueryable OrderByDescending(Expression<Func<Tbl_Entity, int>> orderByPredict) { if (orderByPredict == null) { return _dbSet; } return _dbSet.OrderByDescending(orderByPredict); } /// /// Executes procedure in database and returns result /// ///////// public IEnumerable GetResultBySqlProcedure(string query, params object[] parameters) { if (parameters != null) return _DBEntity.Database.SqlQuery(query, parameters).ToList(); else return _DBEntity.Database.SqlQuery(query).ToList(); } } } |
Payment option is done through a dummy page in Part-3 of this ASP.NET MVC Shopping Cart Application. But if you really want to understand an integration of payment for your application through Paypal, we recommend the implementation here. Vojislav Kovacevic has explained clearly the process of integrating your shopping cart with Paypal using practical video lessons. You can easily integrate your MVC Shopping Store Application with Paypal following a step by step approach.
So far in this ASP.NET MVC Shopping Cart Tutorial Series, we have covered mostly the administration features. Also, we have setup the project and all related details. In coming sections we will cover features related to end user i.e. Product Display Center, Product Search, Display by Category, List and Detailed View, Adding/Removing Items from Shopping Cart and more.
Complete Source Code for the ASP.NET MVC Shopping Cart application is now available to download here. You just need to be a REGISTERED Member to download Source Code. Registration is FREE 🙂
Part 2 - Building ASP.NET MVC Shopping Cart Application
Keep in touch! Soon the source code for running ASP.NET MVC Shopping Cart will be uploaded and available.
Other Related Articles:
- ASP.NET MVC Vs Web Forms
- A Practical Guide to ASP.NET Web API
- Building Your First SPA Application using AngularJS and Web API
- Practical guide to WCF RESTful Service
- Using Bootstrap 3 with ASP.NET MVC5
- Postback Vs Callback
Advanced Web Developer Interview Questions and Answers Series:
- Top 10 HTML5 Interview Questions
- Top 10 ASP.NET Interview Questions
- Comprehensive Series of ASP.NET Interview Questions
- Top 10 ASP.NET MVC Interview Questions
- Top 10 ASP.NET Web API Interview Questions
- Top 10 ASP.NET AJAX Interview Questions
- Top 10 WCF Interview Questions
- Comprehensive Series of WCF Interview Questions
- Top 20 AngularJS Interview Questions
- Top 15 Bootstrap Interview Questions